
Sponsored

shine

Trailhunter
Well-known member
First Name
Chris
Joined
Mar 8, 2025
Threads
4
Messages
231
Reaction score
219
Location
Seattle
Vehicle(s)
2025 4Runner Trailhunter, 2008 4Runner SR5
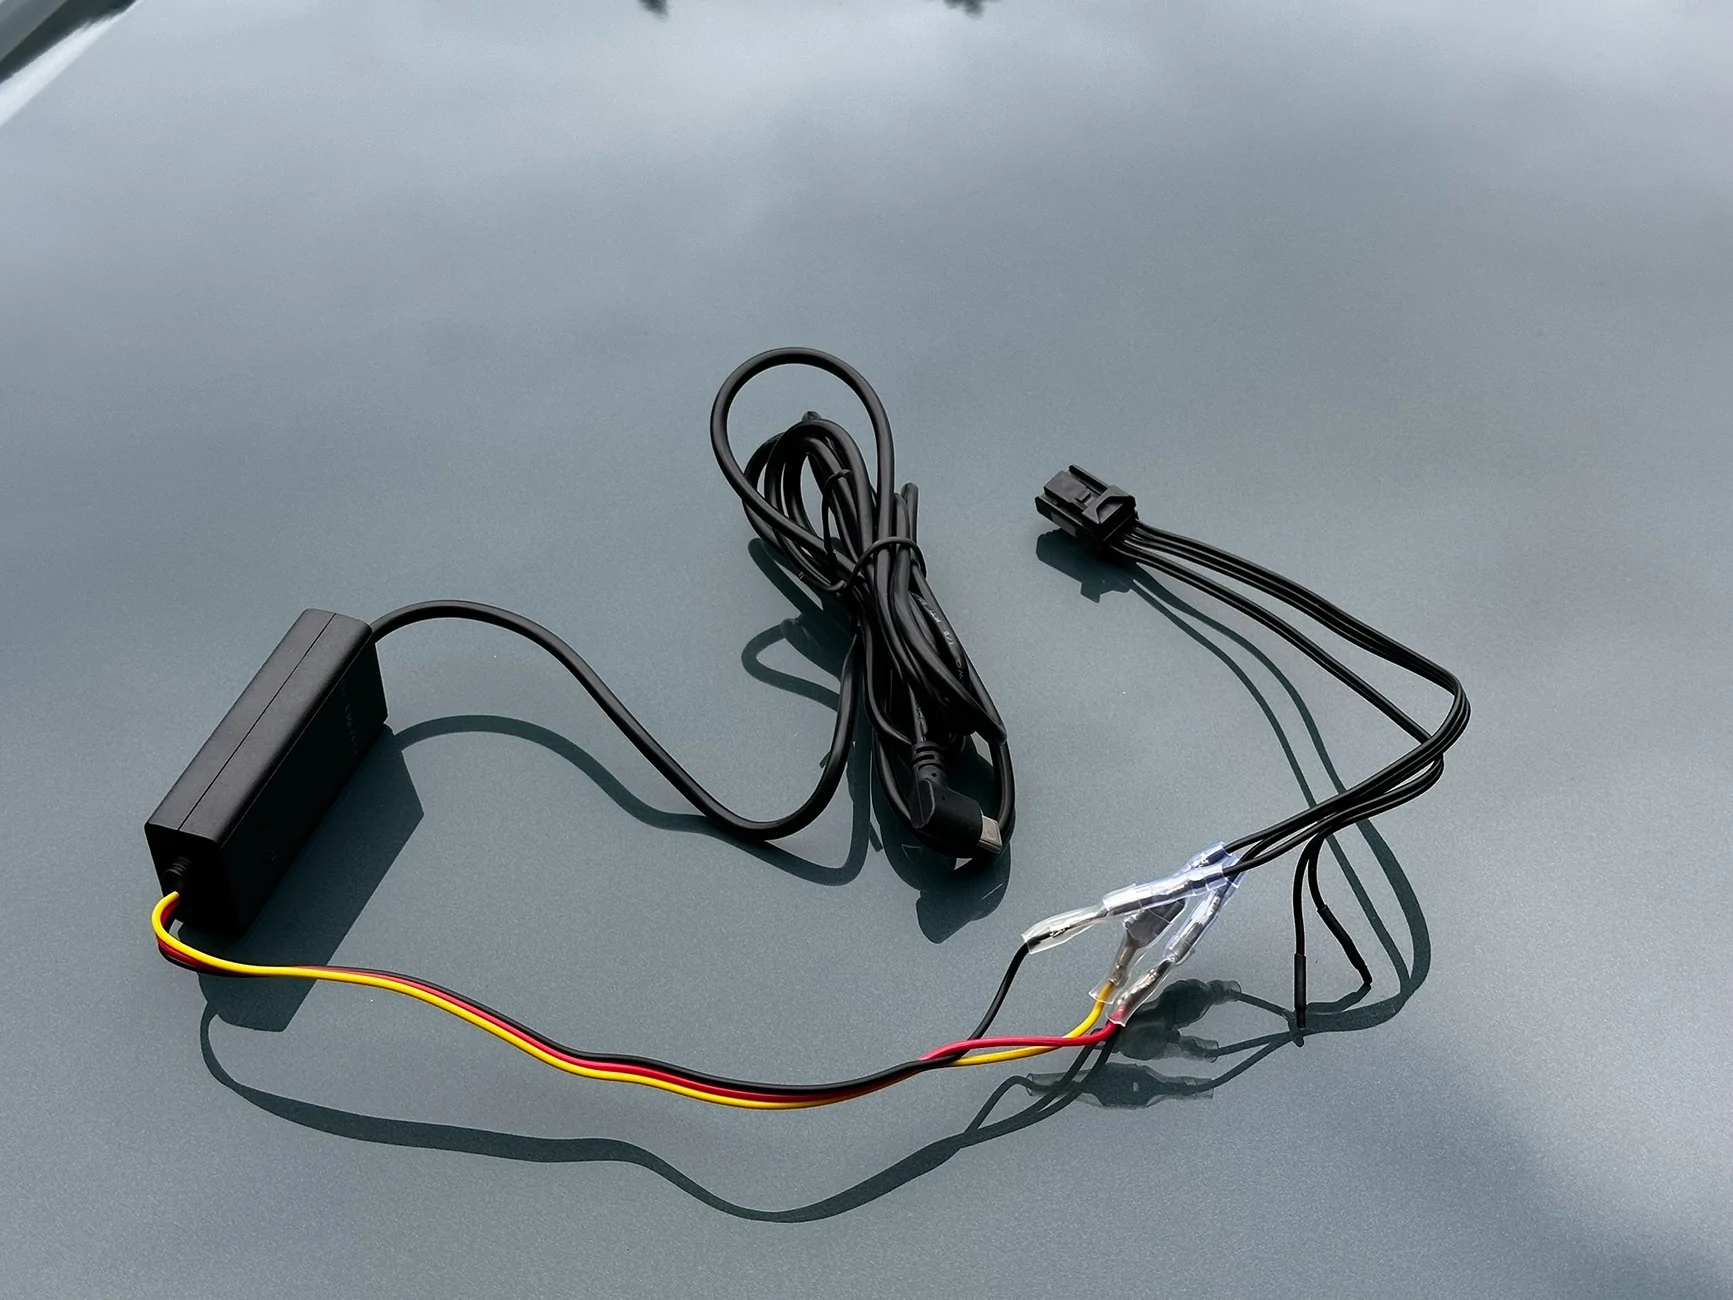
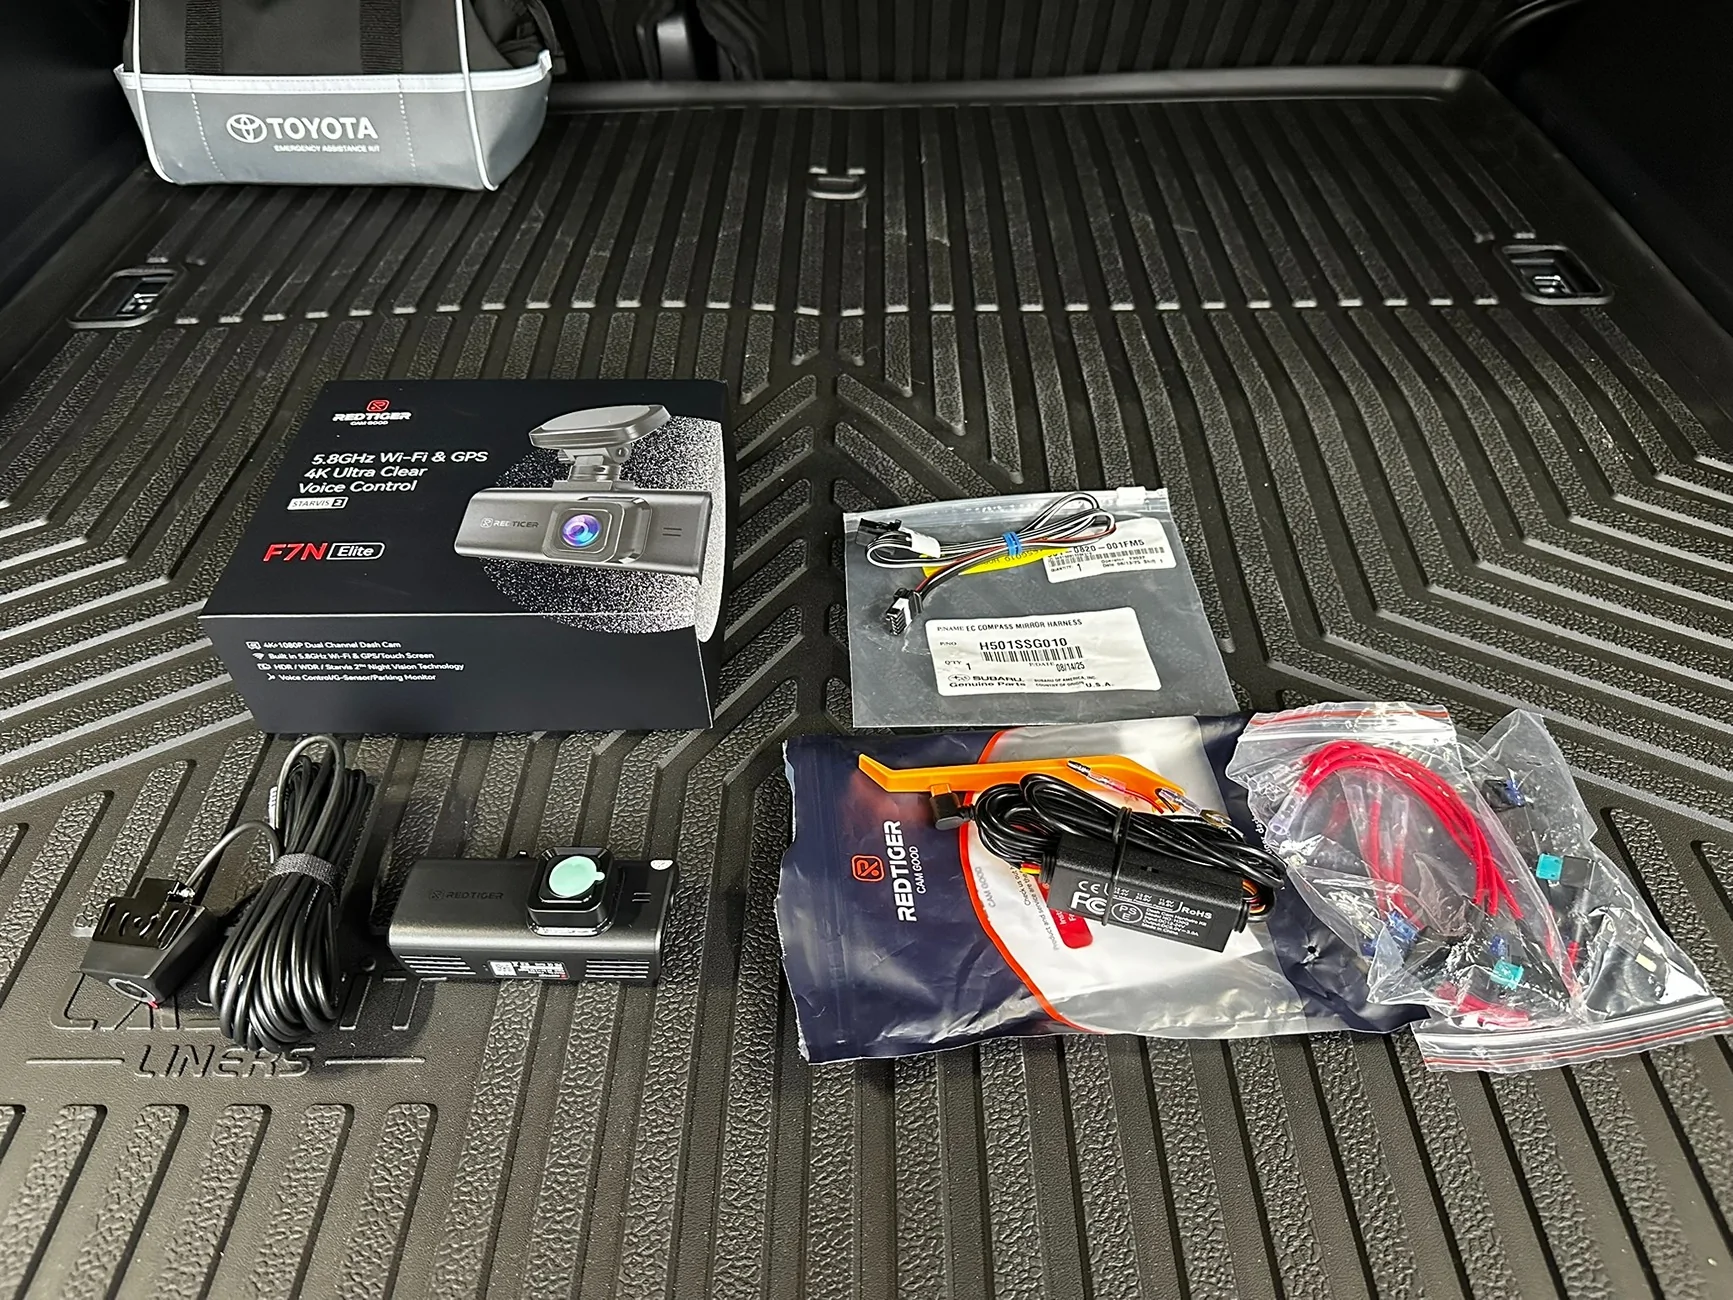
Decided to install a Redtiger dash cam with an external rear camera and a hard wire kit. I've used an older model with the same setup on my 4th gen without any issues, so decided to do the same with my new 4Runner. Here's what I started with:

2025 2026 4runner 6th gen Redtiger F7N Elite Dash Cam (front and external rear camera) w/ rear mount install with lots of pictures! IMG_7238

That's the rear camera, main unit, and hardwire kit in the front. Behind the hard wire kit is a Subaru harness that I used to power the dash cam off the plug that's already behind the headliner by the roof console.

You can all these items from Amazon:
Redtiger F7N Elite https://a.co/d/1z1Q3zo
Hardwire kit https://a.co/d/2ZwgWQq
Subaru harness H501SSG010 https://a.co/d/bFwdYbL
You can probably get the Subaru harness for less from your local Subaru dealer, that's what I did - https://parts.subaru.com

Before doing anything else I used the 12v cigarette lighter connector that came with the camera (not shown above) to power up the dash cam and rear camera to test. It all worked as expected.

Started by creating the wiring harness for the dash cam. Checked the connector inside the headliner with a multimeter to make sure I had the right connector before started. Cut the Subaru harness and the hardwire kit and connected them with spade connectors. Added some shrink wrap on top of the connectors for good measure.
2025 2026 4runner 6th gen Redtiger F7N Elite Dash Cam (front and external rear camera) w/ rear mount install with lots of pictures! IMG_7244


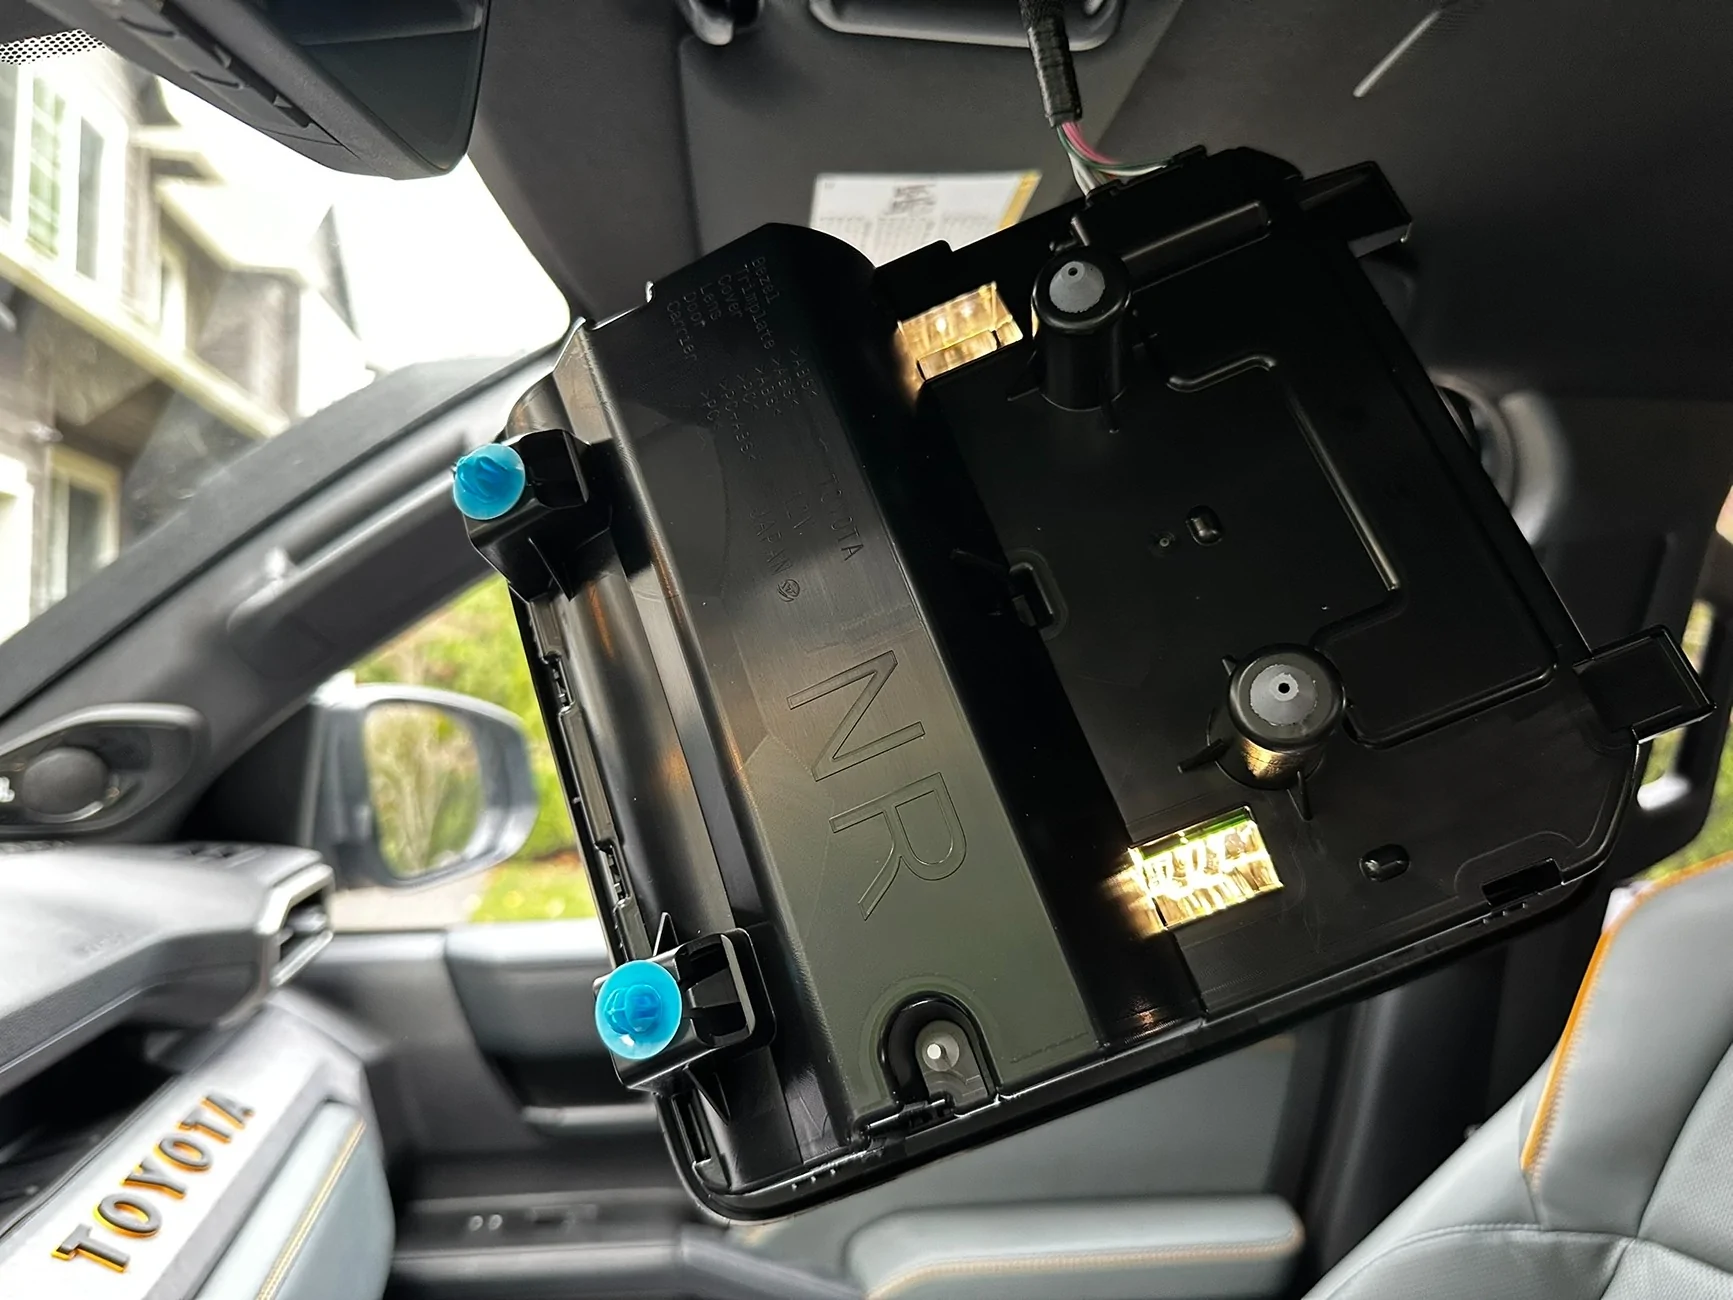
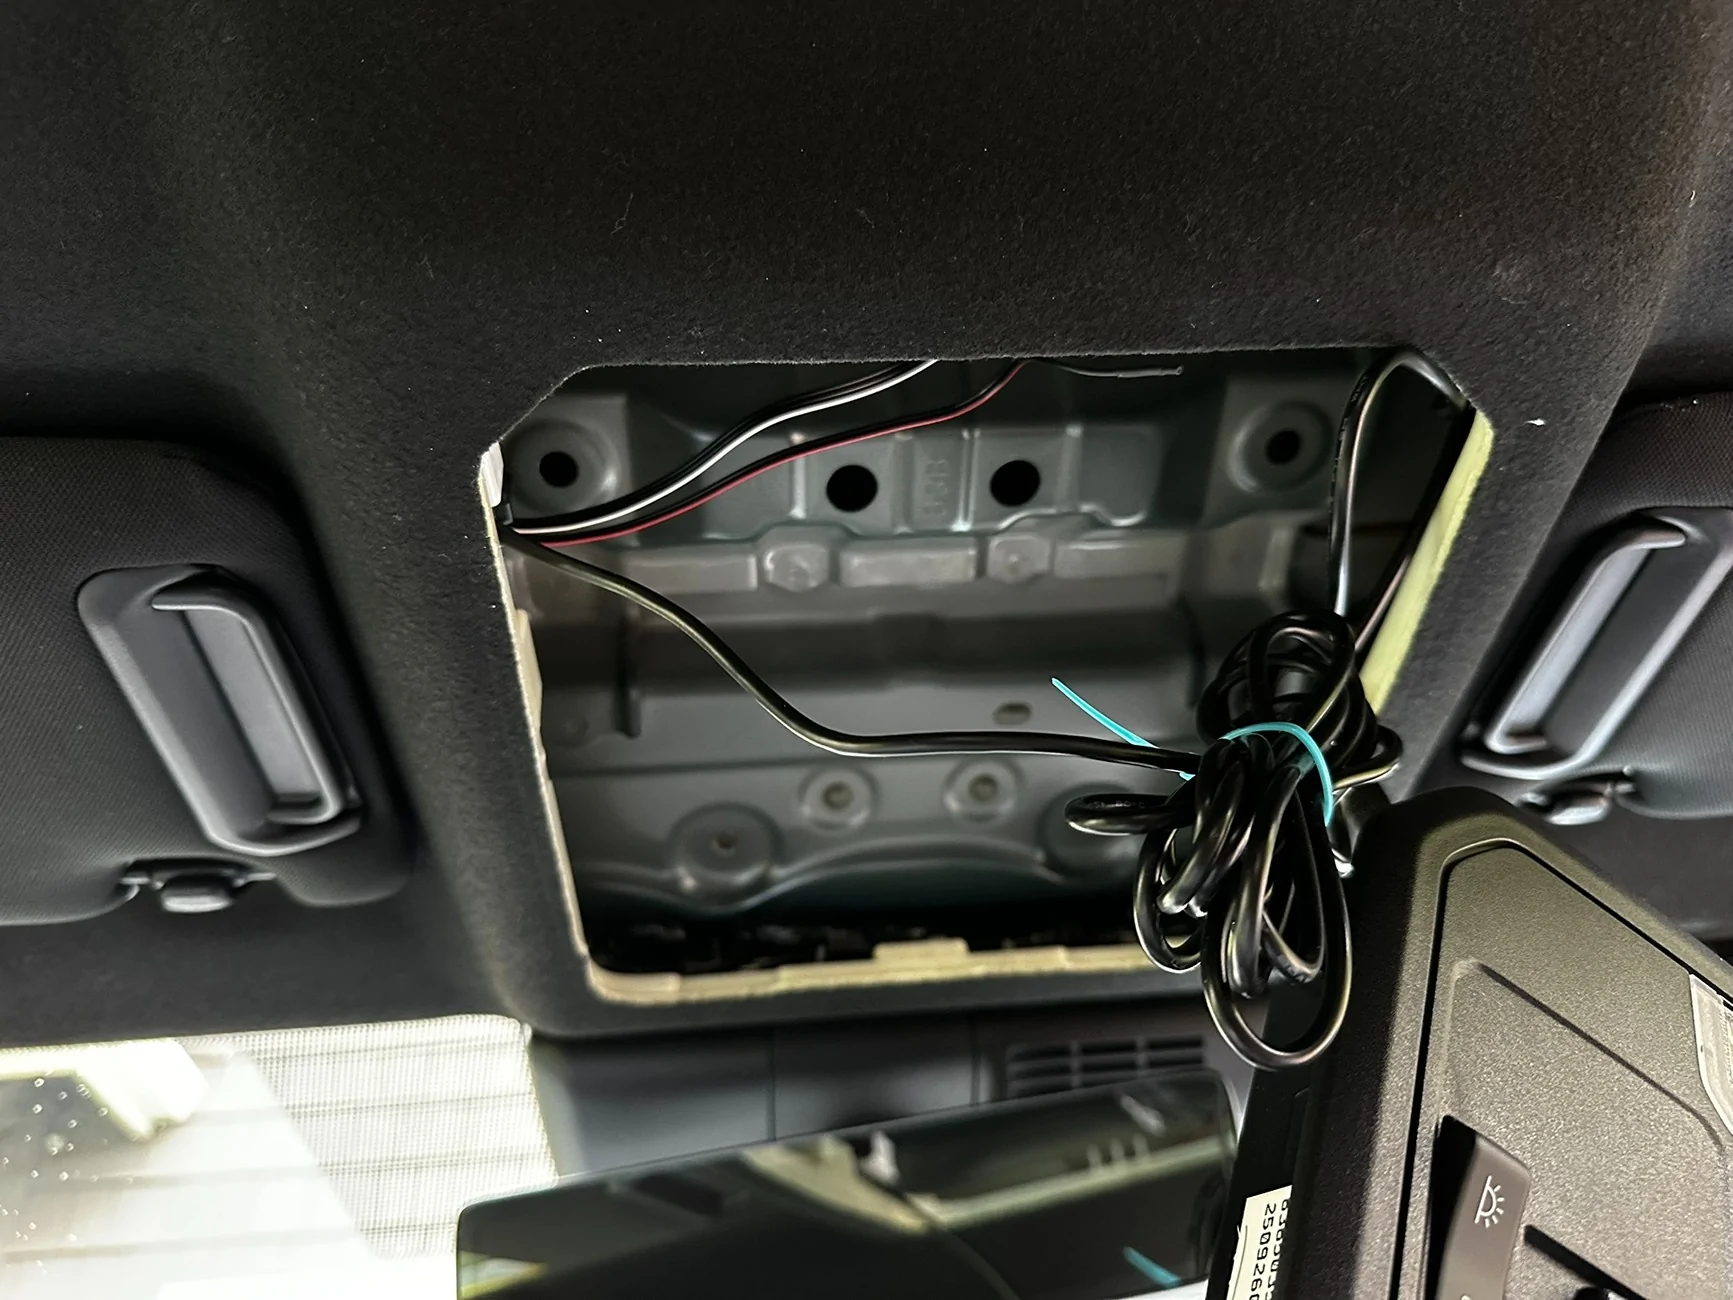
To get access to the connector above the headliner, remove the roof console by pulling down on the front. That is the side towards the windshield. I used a trim tool to help me get a grip around the front edge and pulled it down with my fingers and left it hanging by the wiring already in place.
2025 2026 4runner 6th gen Redtiger F7N Elite Dash Cam (front and external rear camera) w/ rear mount install with lots of pictures! IMG_7242


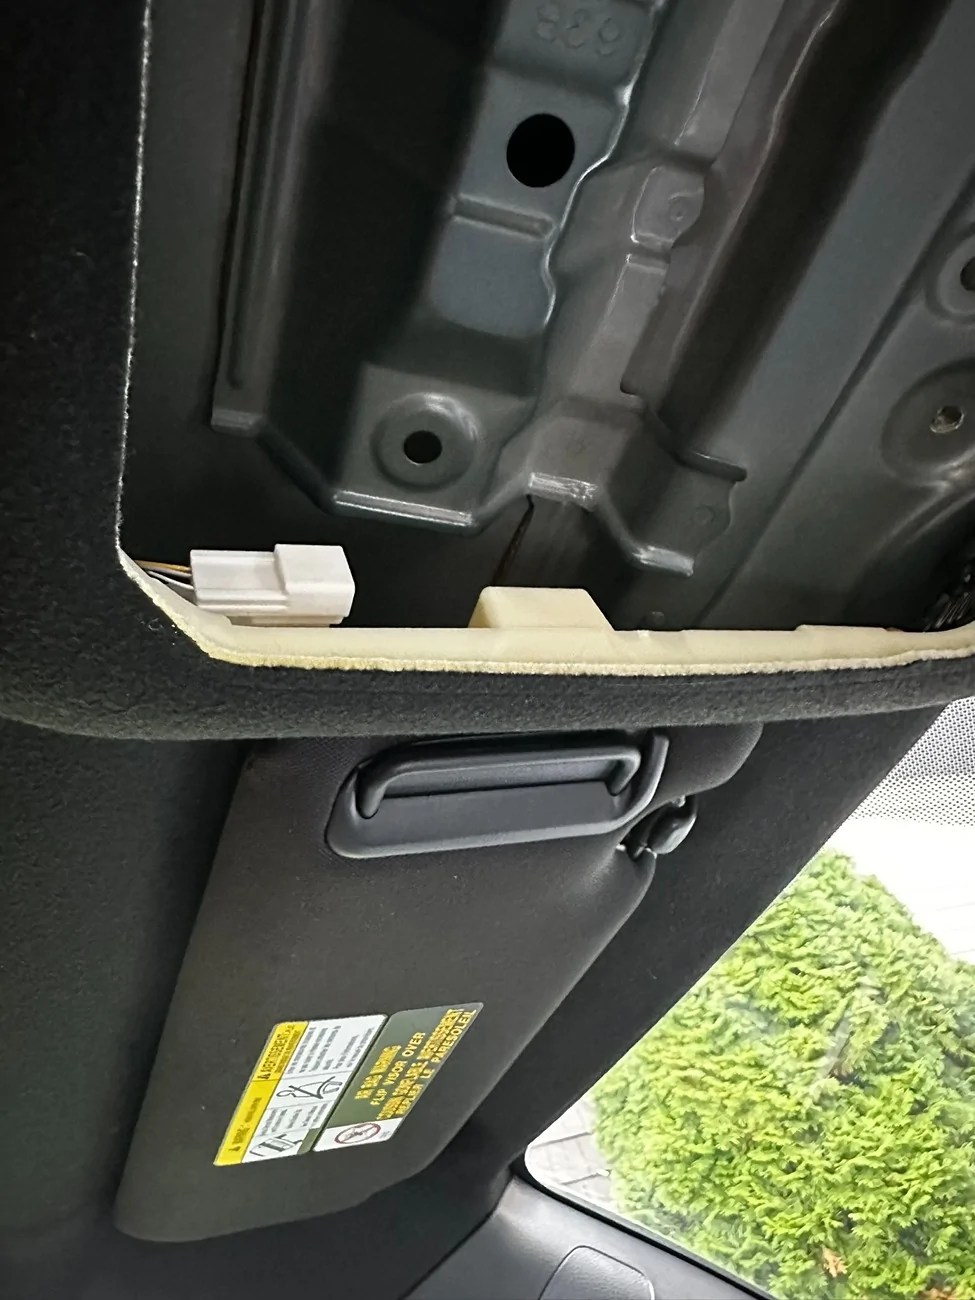
Here you can see the existing dash cam connector
2025 2026 4runner 6th gen Redtiger F7N Elite Dash Cam (front and external rear camera) w/ rear mount install with lots of pictures! IMG_7243


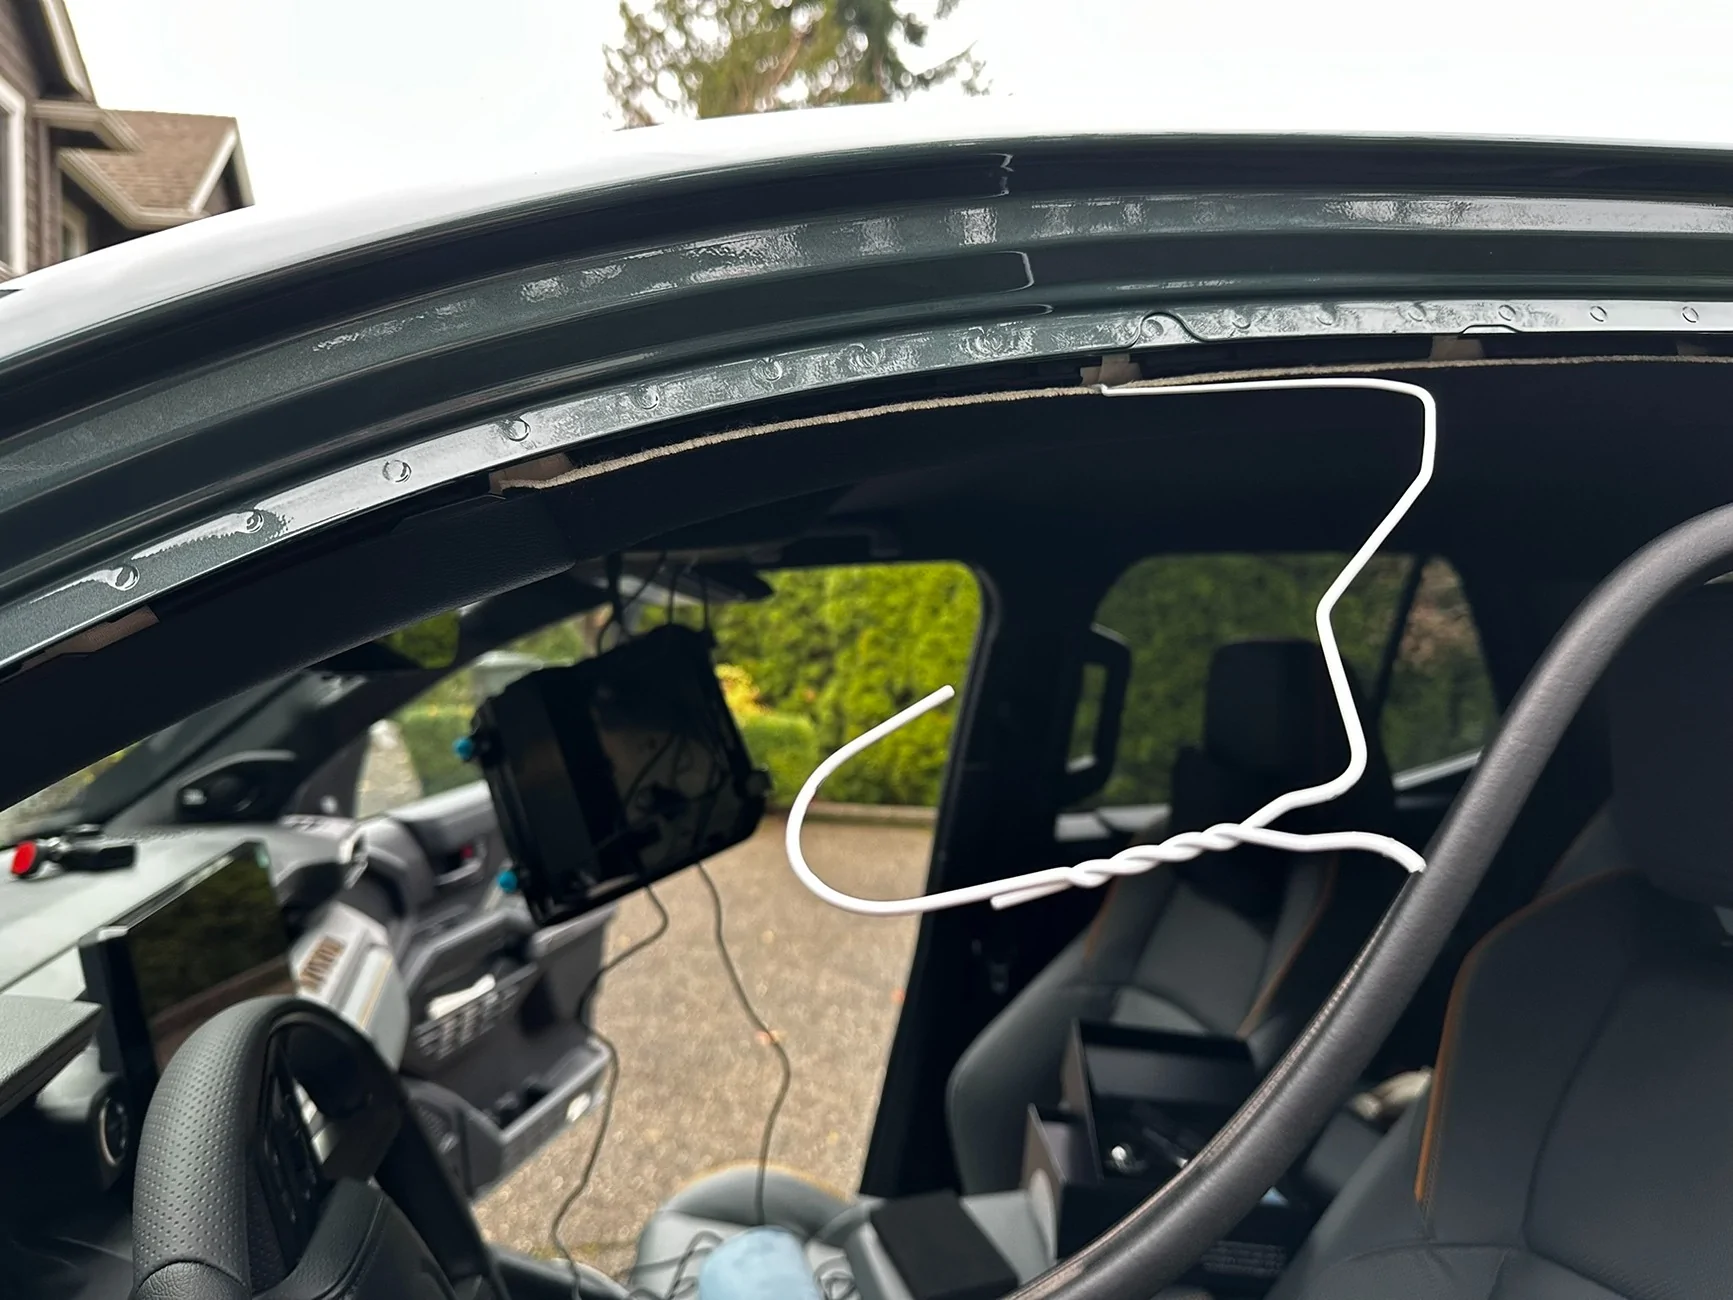
Next, I started pulling the cable to the rear camera. Using an wire hanger cut and straightened out I pulled the cable from the roof console towards the driver's door.
2025 2026 4runner 6th gen Redtiger F7N Elite Dash Cam (front and external rear camera) w/ rear mount install with lots of pictures! IMG_7245
2025 2026 4runner 6th gen Redtiger F7N Elite Dash Cam (front and external rear camera) w/ rear mount install with lots of pictures! IMG_7246


Doing this I was able to avoid the A pillar completely. However, when you peek under the headliner by the driver's door you'll notice the airbag up there. Be careful not to trigger it and be careful not to obstruct its function with the cable. You want to route the cable behind the airbag.
2025 2026 4runner 6th gen Redtiger F7N Elite Dash Cam (front and external rear camera) w/ rear mount install with lots of pictures! IMG_7248


For the final stretch towards the rear I loosened the D pillar trim and pushed the coat hanger tool towards the rear door. Had to try a couple of times before I could get the coat hanger to where I could grab it, but got it eventually. Never had any problems with the coat hanger snagging, but I made sure to close the loop around the cable every time before pulling the coat hanger with the cable attached.

At this point I removed the rear spoiler from the rear door. Found a good description of how to do that on Westcott's 2025 4Runner Ladder Install Video 6th Gen.

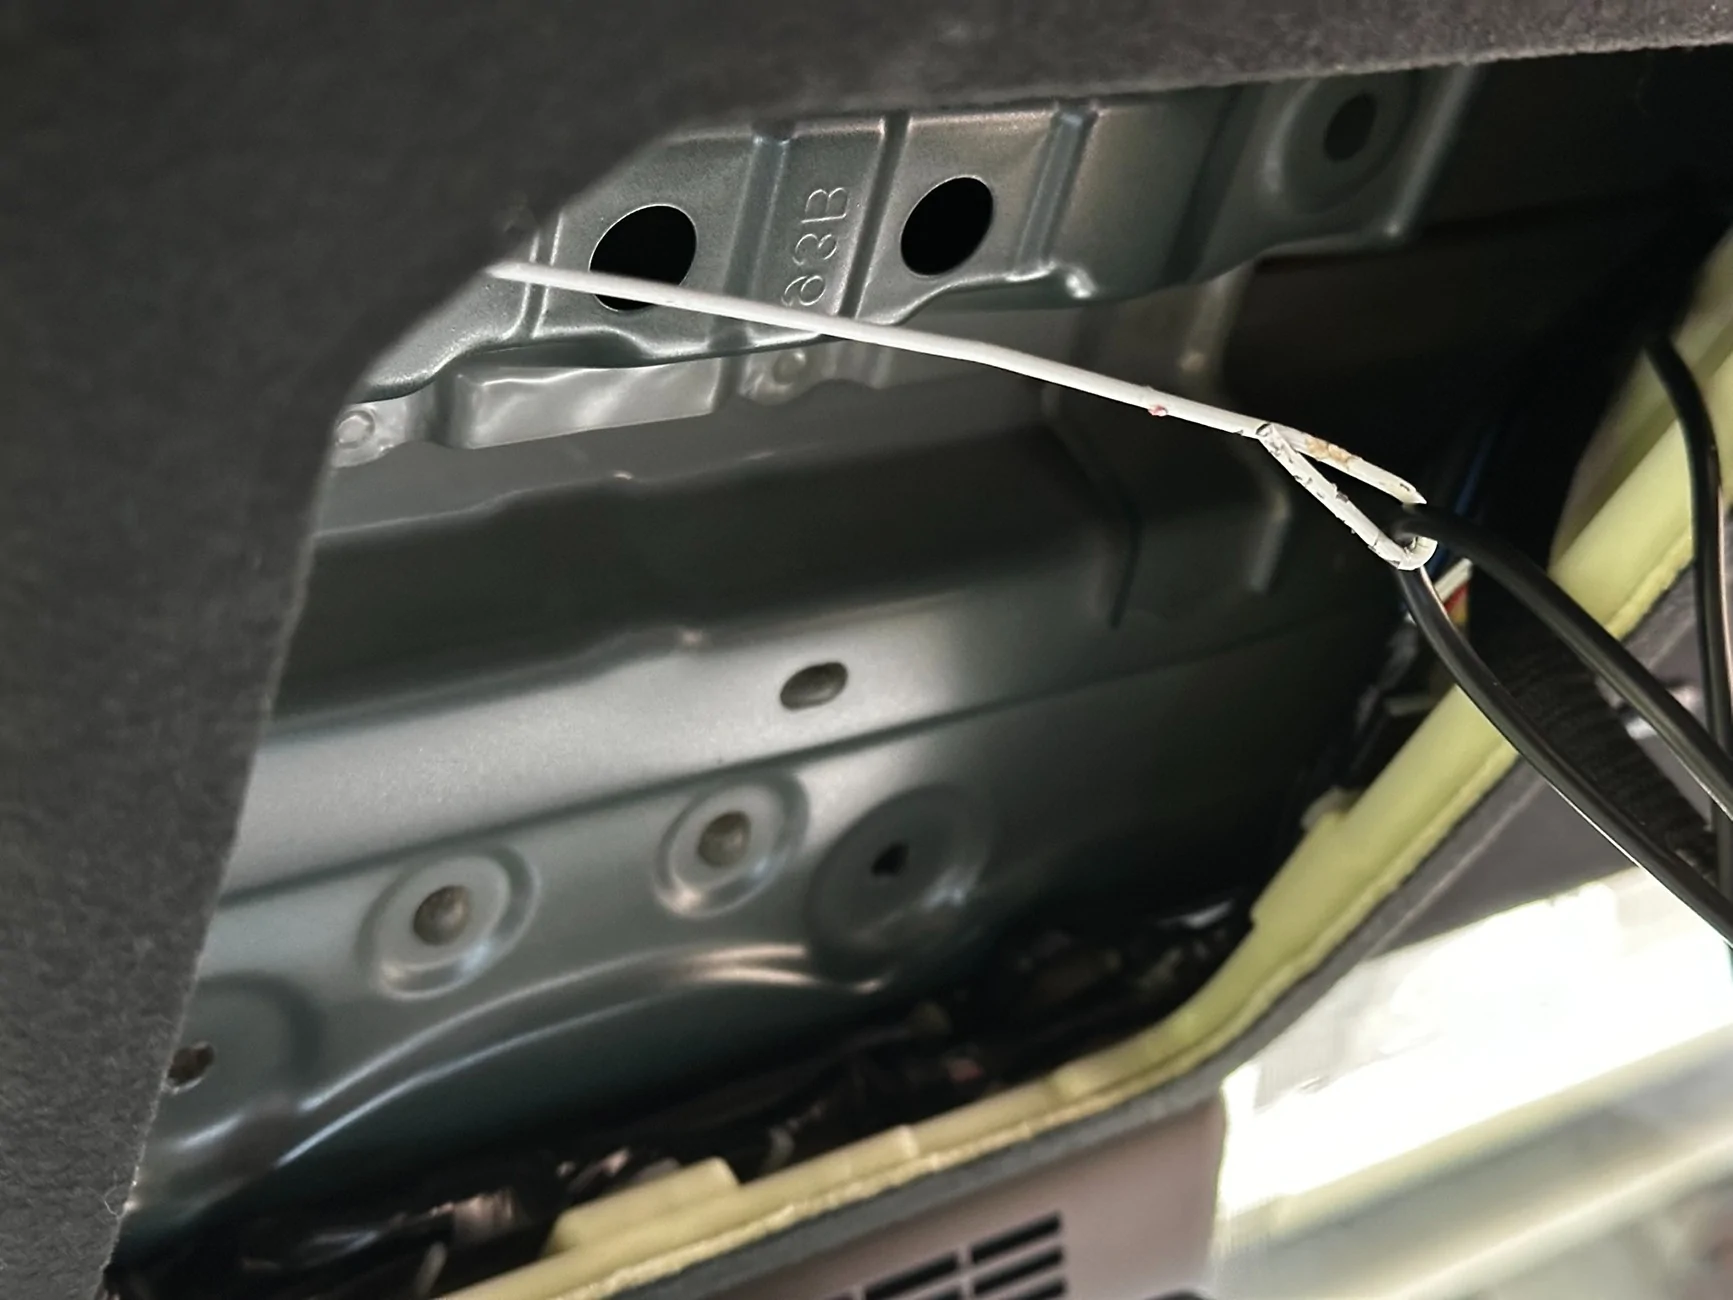
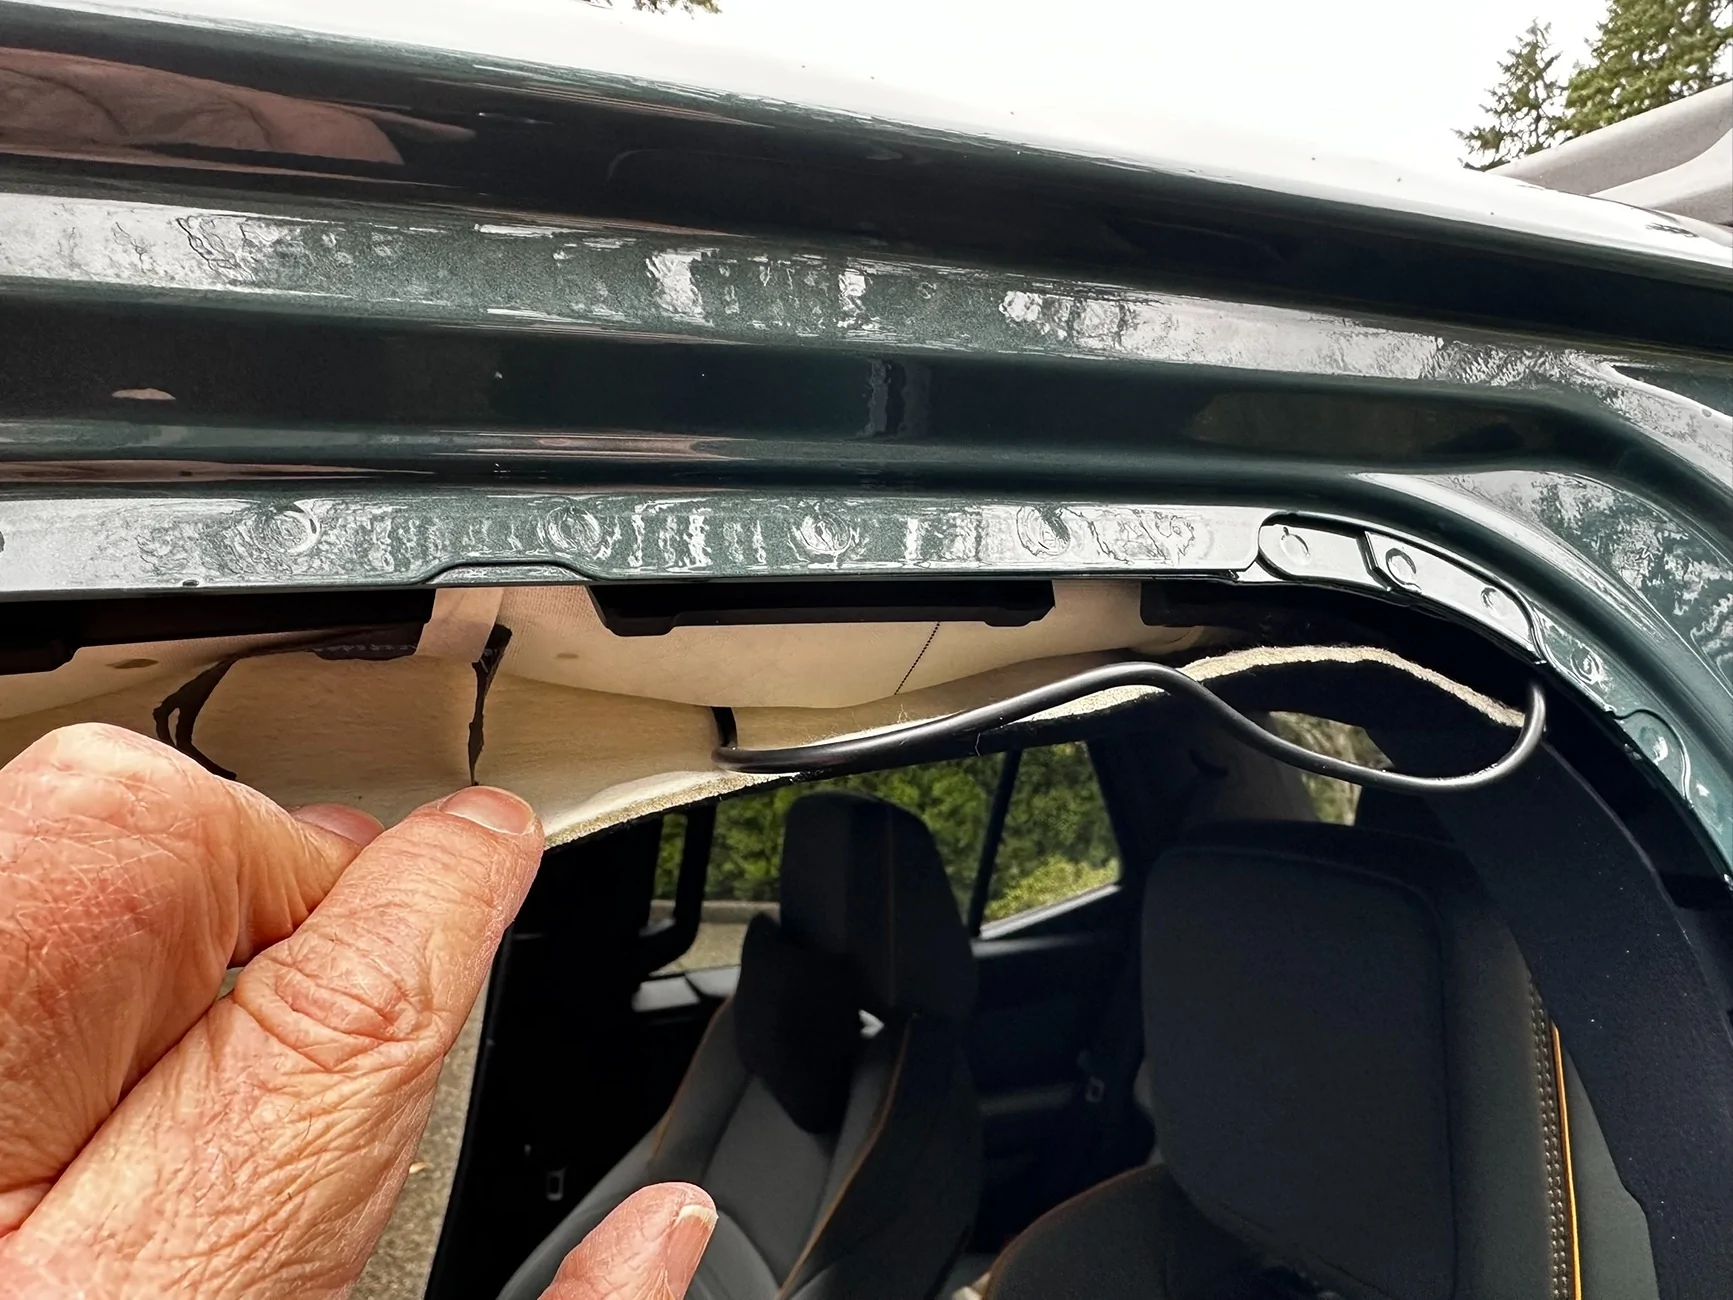
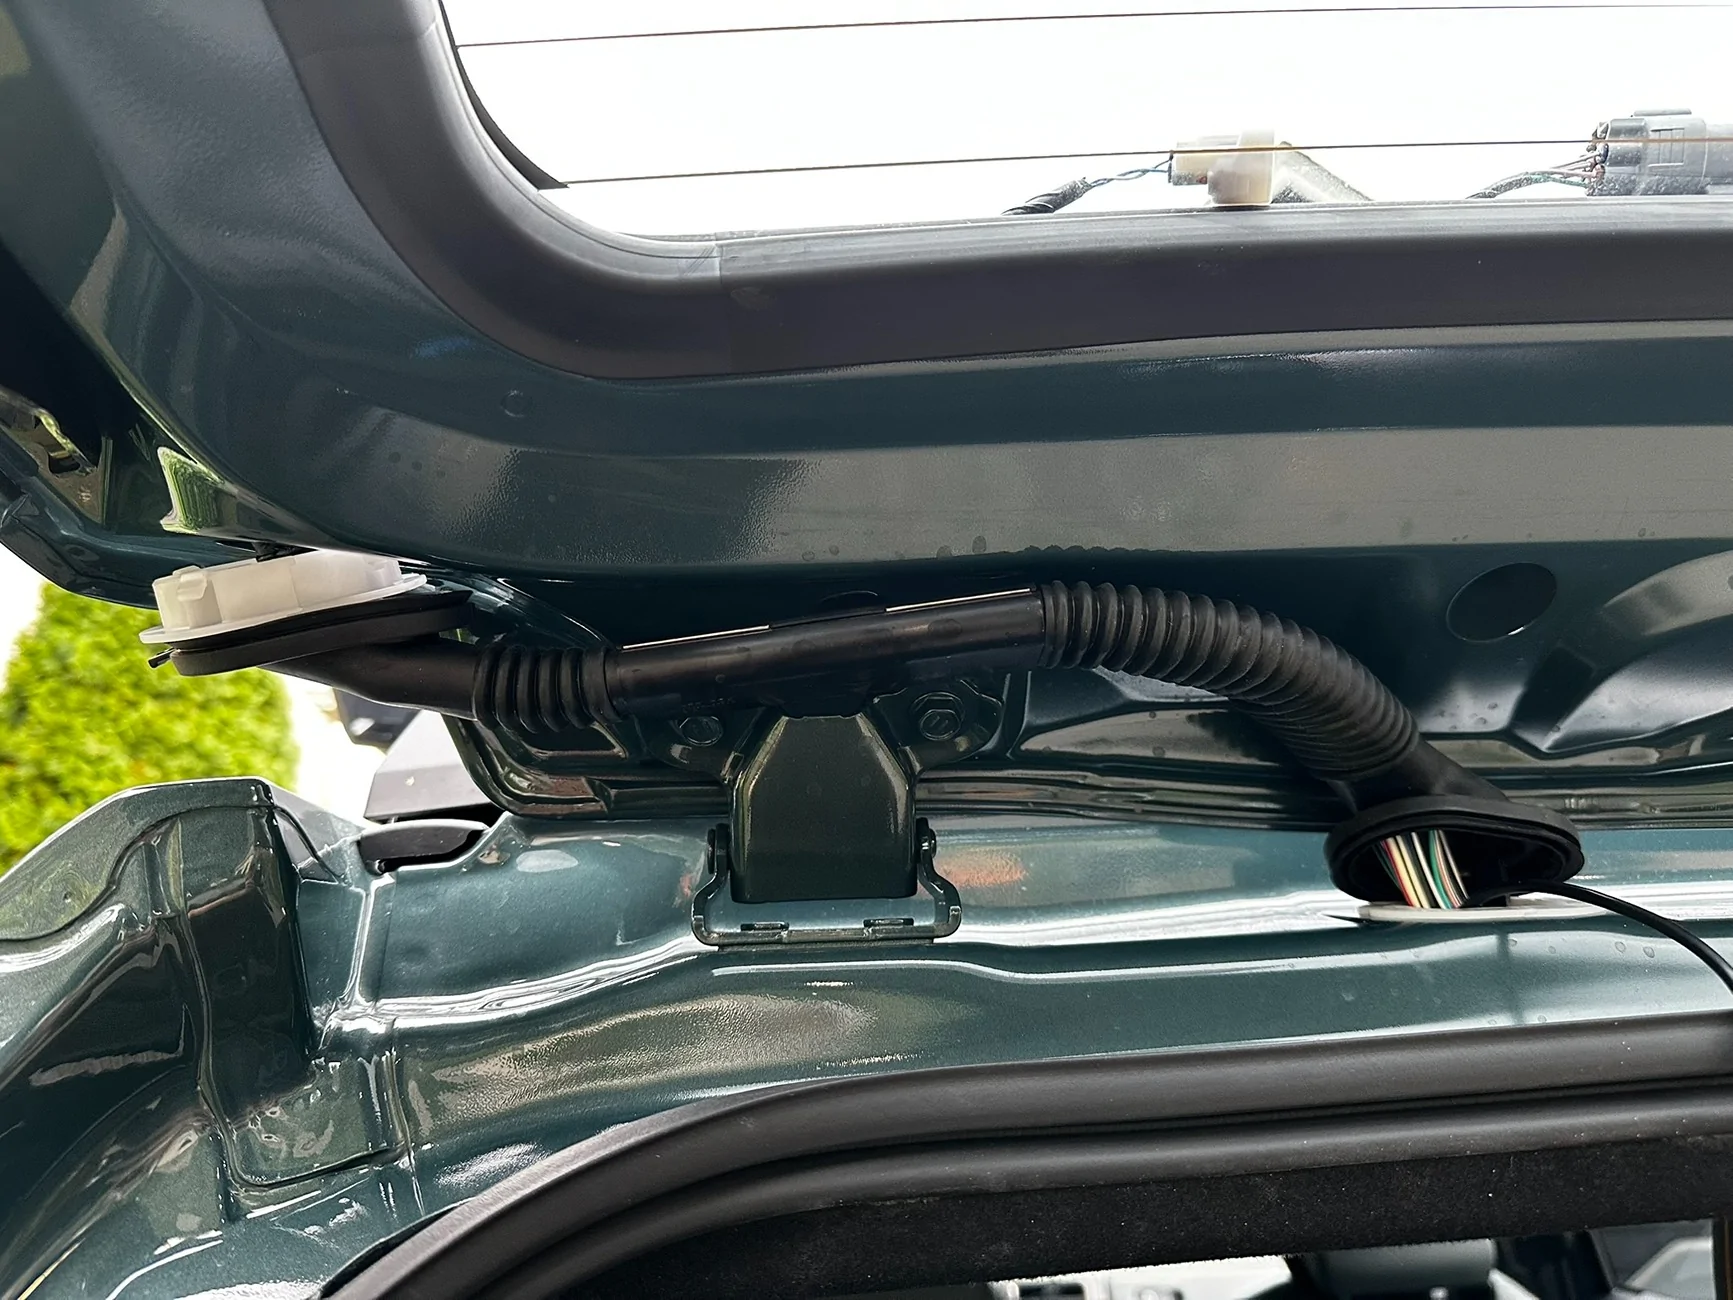
Now to the hardest part, getting the cable through the rubber hose between the back of the roof and the door. I pushed my coat hanger tool from the left to the right, very carefully to not damage any of the other wires in the rubber hose, and after disconnecting it from both the door and the roof of the car. This is also the only place where I damaged any part of the car, one of the tabs on the white plastic part securing the rubber hose to the roof broke off. Not too worried, was able to seat the part sufficiently after I finished the install. Reconnect the hose back after you've put the wire through.

2025 2026 4runner 6th gen Redtiger F7N Elite Dash Cam (front and external rear camera) w/ rear mount install with lots of pictures! IMG_7251


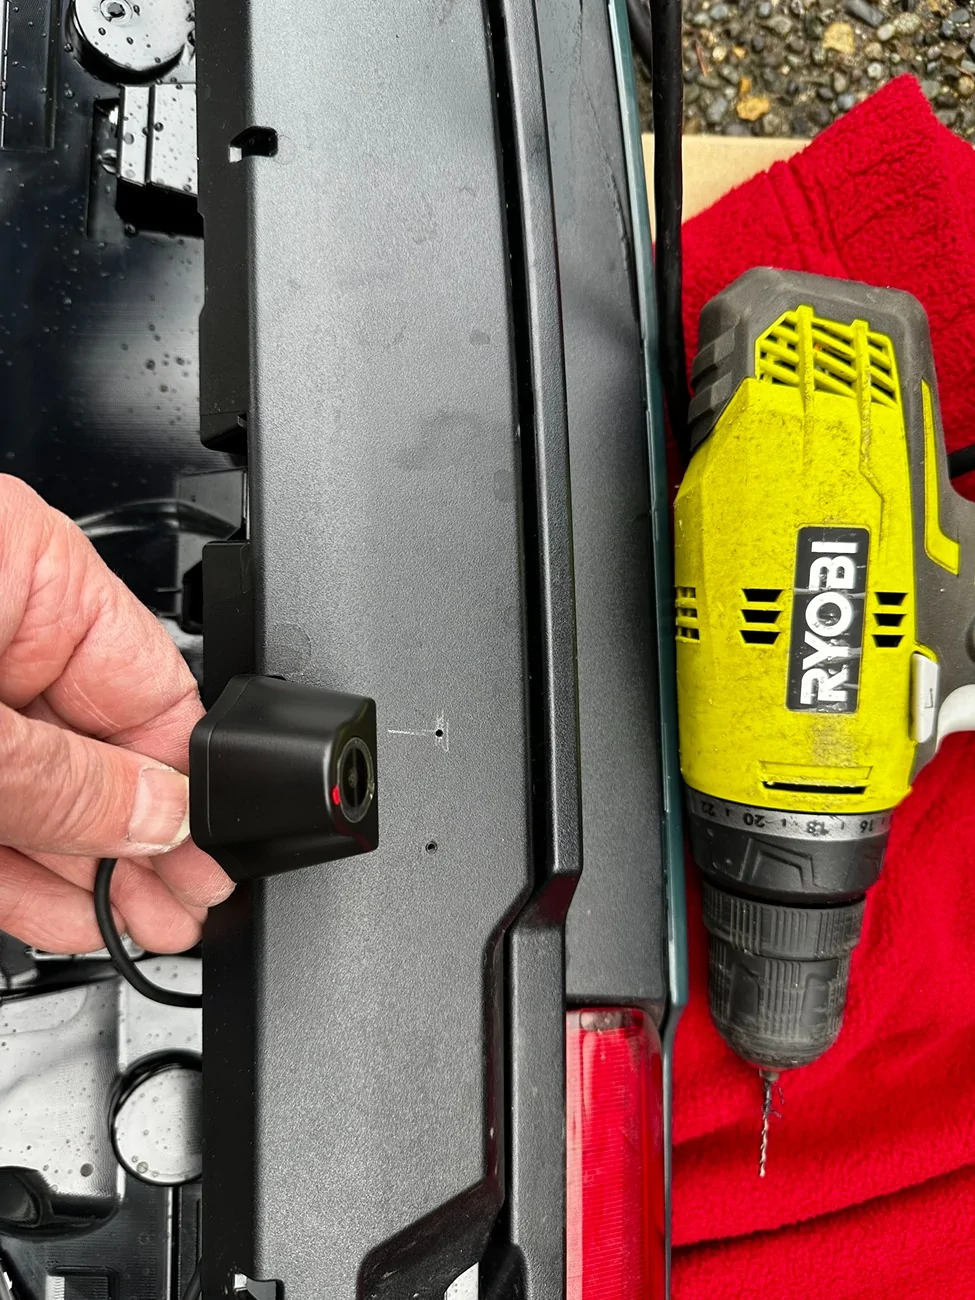
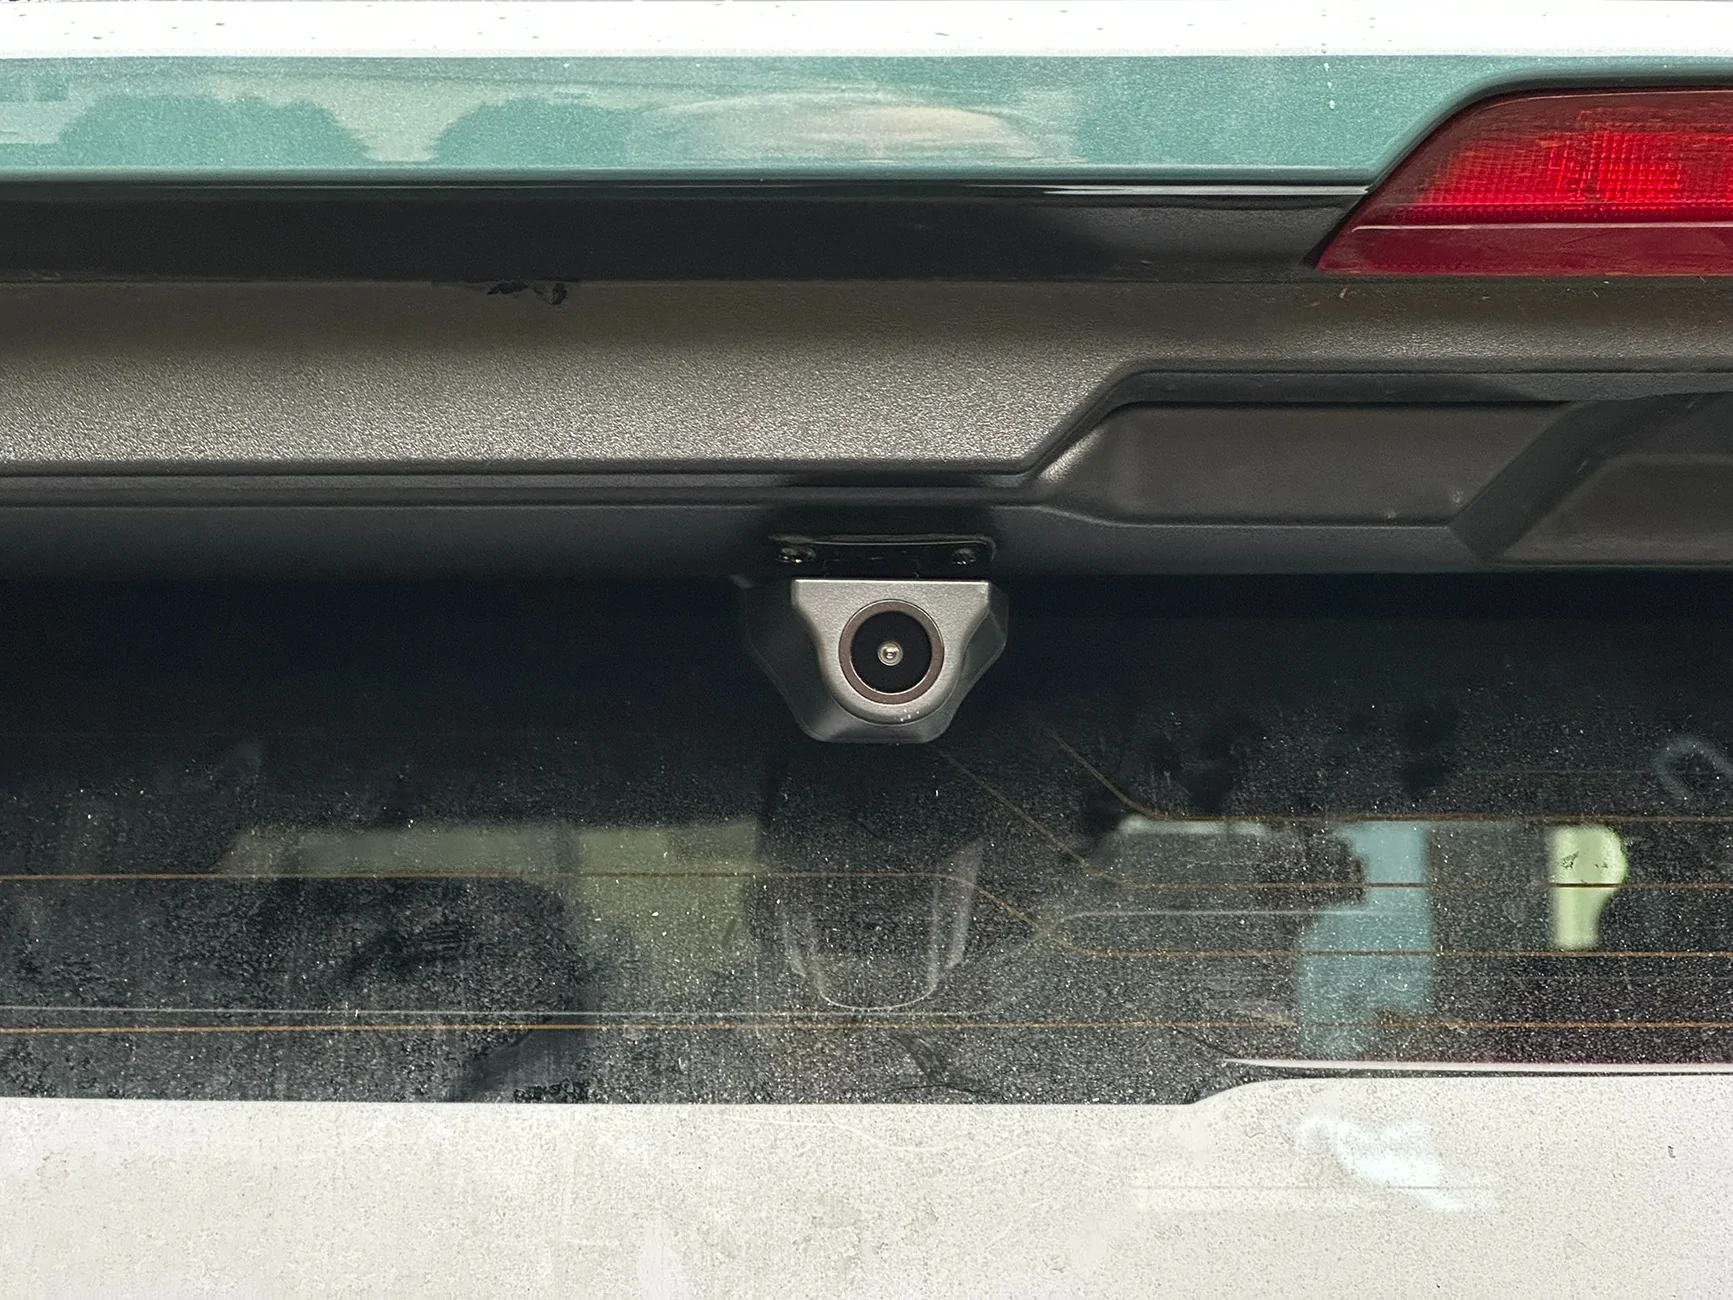
Now to the fun part, drilling holes into my new 4Runner...
2025 2026 4runner 6th gen Redtiger F7N Elite Dash Cam (front and external rear camera) w/ rear mount install with lots of pictures! IMG_7254


Now double-check that all the clips are where they need to be and put the rear spoiler back on again. The camera is connected to the cable that you just pulled from the front of the cab with a four pin connector. I left this connector inside the spoiler to make it easy to disconnect again. You could always put some tape or heat shrink around this connector if you're concerned about moisture ingress. I decided not to do that, at least not for now.

Also, this is a good time to remove slack from the cable you and pull excess into the opening where the roof console belongs. Pull the rear camera cable and usb-c power cable under the headliner to where you want to mount the dash cam and zip time up any excess cable. There's plenty of space above the headliner for the excess cable.
2025 2026 4runner 6th gen Redtiger F7N Elite Dash Cam (front and external rear camera) w/ rear mount install with lots of pictures! IMG_7256


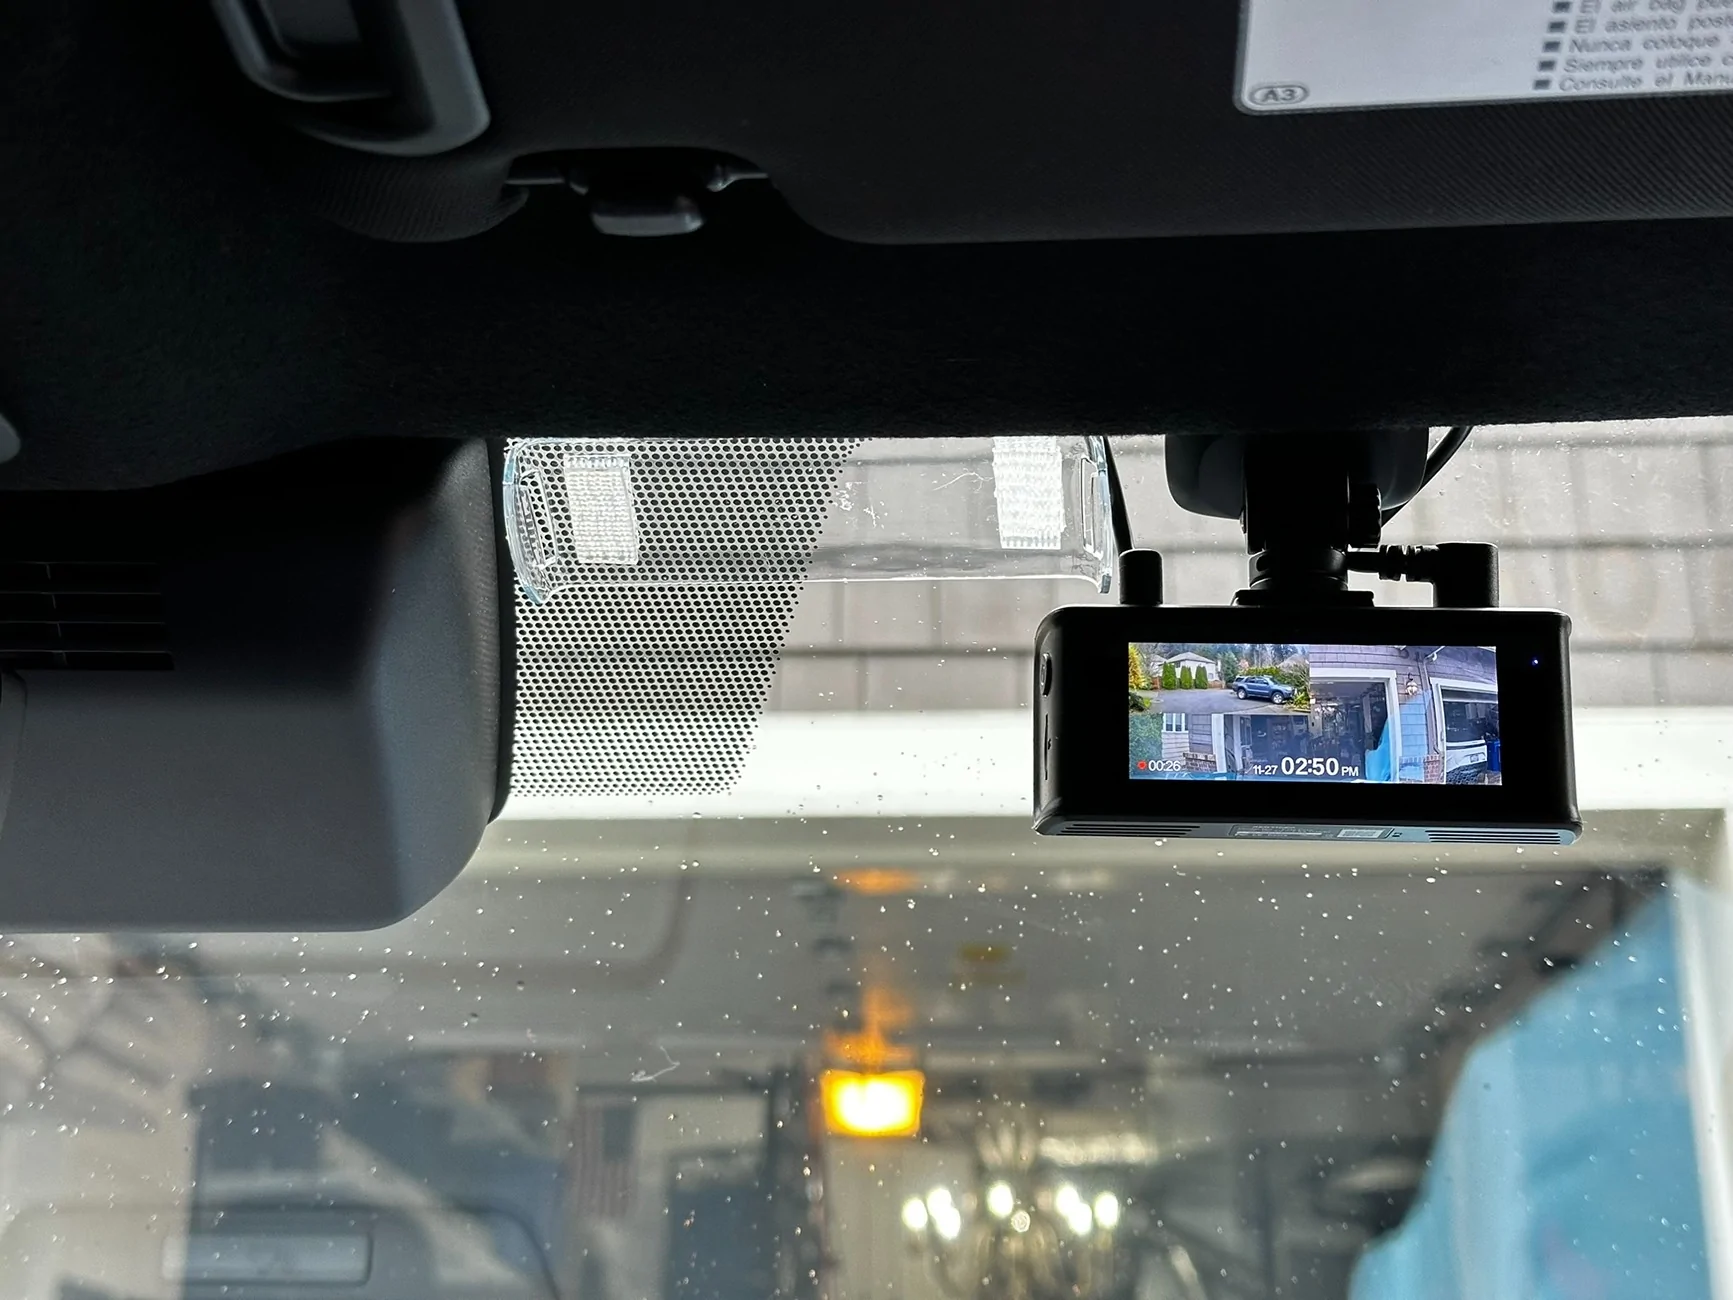
Clean the inside of the windshield and stick the dash cam where you want it! Connect the rear dash cam and power cables to the dash cam and pull excess back in to the cavity inside the headliner before putting the roof console back on.

That's it! Here's what my dash cam and rear cam look like:
2025 2026 4runner 6th gen Redtiger F7N Elite Dash Cam (front and external rear camera) w/ rear mount install with lots of pictures! IMG_7257

2025 2026 4runner 6th gen Redtiger F7N Elite Dash Cam (front and external rear camera) w/ rear mount install with lots of pictures! IMG_7258


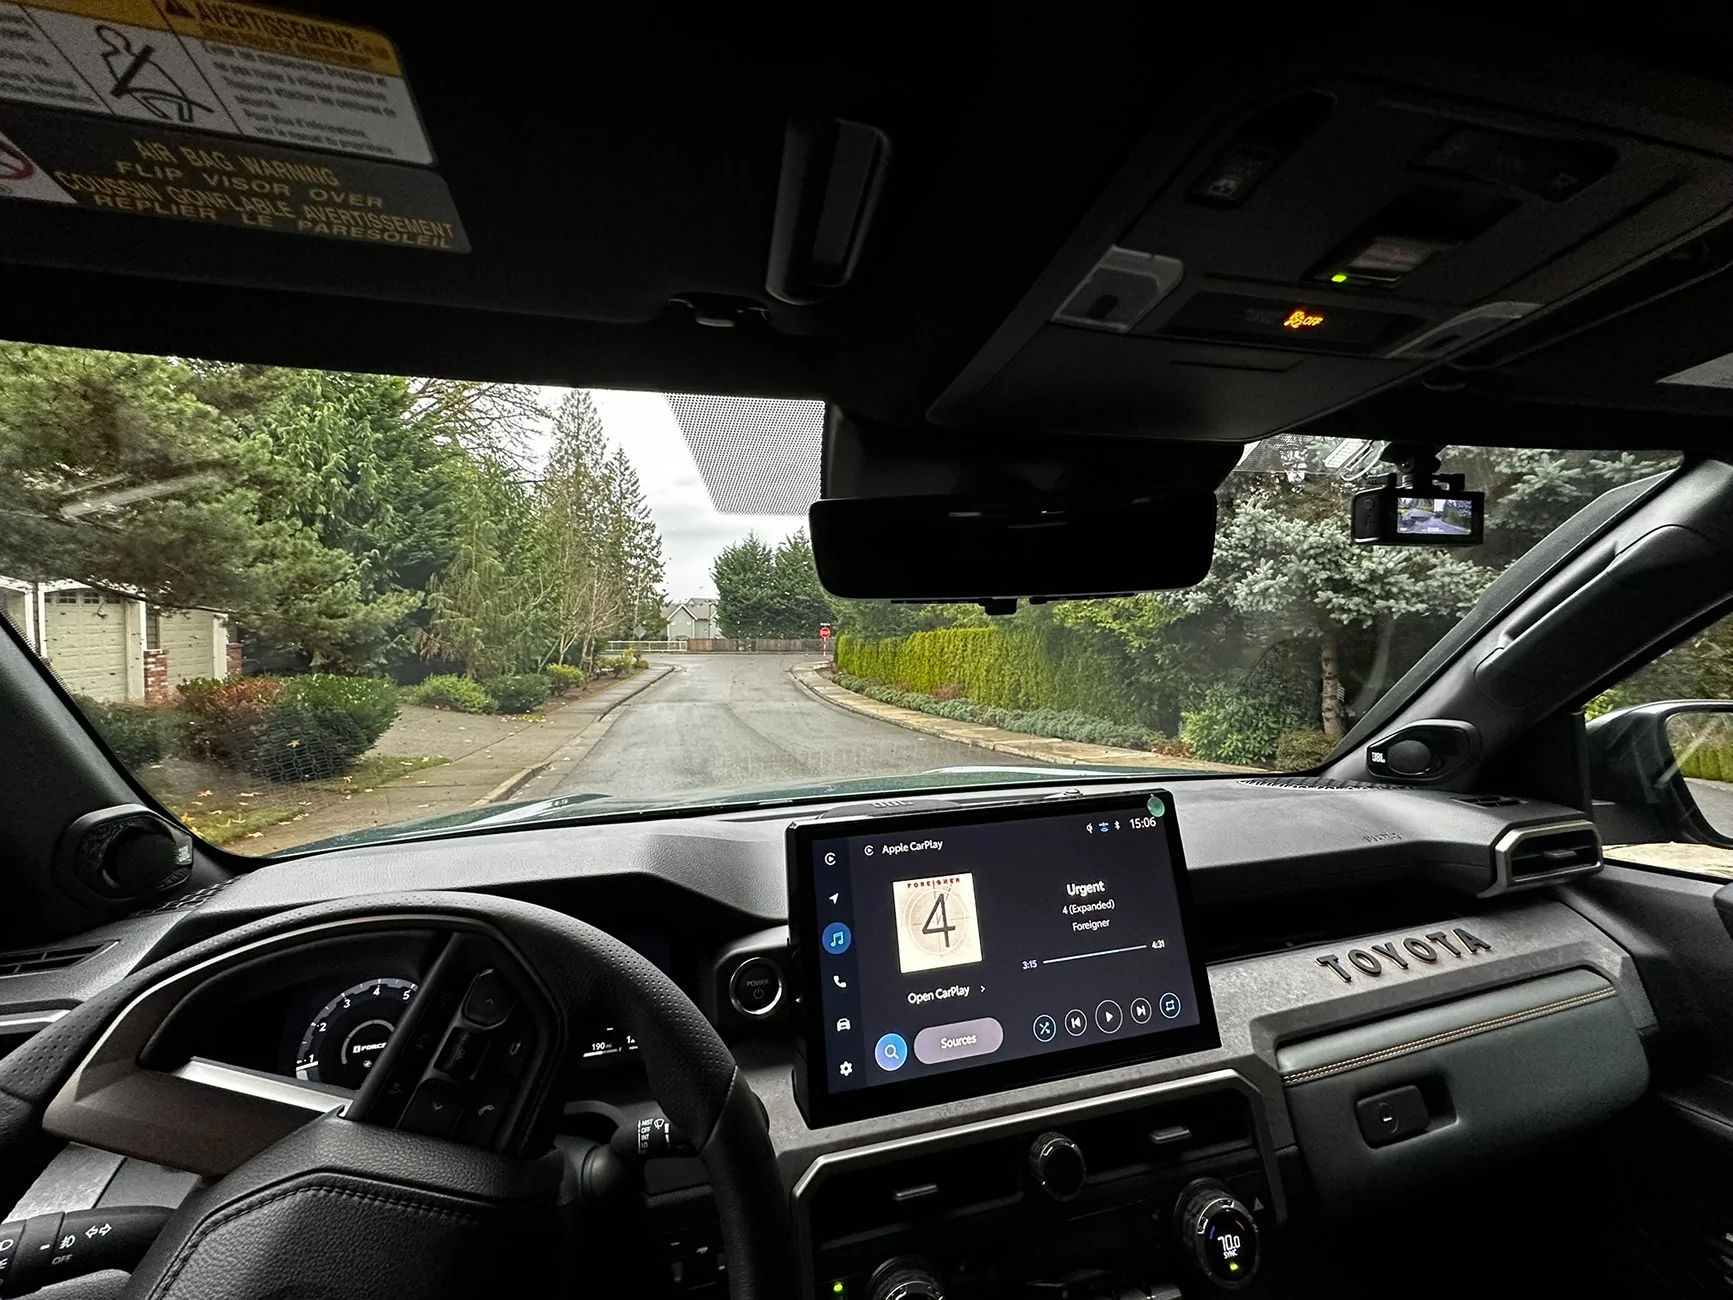
And here's what it looks like from the driver's seat:
2025 2026 4runner 6th gen Redtiger F7N Elite Dash Cam (front and external rear camera) w/ rear mount install with lots of pictures! IMG_7260
Sponsored

 
Last edited:

nadaal22

SR5
New member
First Name
Syed Nadaal
Joined
Apr 27, 2026
Threads
0
Messages
3
Reaction score
0
Location
AZ
Vehicle(s)
4Runner 6th gen
Hey ! Thank you so much for putting so much detail into it!
Appreciate your time.

just got my 6th gen. Will be following your steps.

just curious how did you figure out that subaru harness works perfect with Toyota dash cam wiring ?
 
OP
OP
shine

shine

Trailhunter
Well-known member
First Name
Chris
Joined
Mar 8, 2025
Threads
4
Messages
231
Reaction score
219
Location
Seattle
Vehicle(s)
2025 4Runner Trailhunter, 2008 4Runner SR5
just curious how did you figure out that subaru harness works perfect with Toyota dash cam wiring ?
Just googling around. If I remember correctly, I found it on a thread where someone had added a dashcam to their Sienna. Knowing that Toyota tends to reuse parts I decided to take a look at the connector in the ceiling of my 4Runner and they seemed to match.
 

JCP

TRD Off-Road Premium
Well-known member
First Name
James
Joined
Jul 1, 2025
Threads
2
Messages
63
Reaction score
16
Location
Bay Area
Vehicle(s)
2026 4runner TRD Offroad Premium
Thanks for posting this in such detail! When splicing the wires from the harness to the hardwire kit, is it obvious which wires line up? If not, I can try and follow the wires in your photo.
 
Last edited:
OP
OP
shine

shine

Trailhunter
Well-known member
First Name
Chris
Joined
Mar 8, 2025
Threads
4
Messages
231
Reaction score
219
Location
Seattle
Vehicle(s)
2025 4Runner Trailhunter, 2008 4Runner SR5
Thanks for posting this in such detail! When splicing the wires from the harness to the hardwire kit, is it obvious which wires line up? If not, I can try and follow the wires in your photo.
Not obvious, but easy to figure out with a multimeter.

I cut the Subaru harness in the middle and plugged it into the connector in the ceiling. Making sure the black wire of the multimeter has a good connection to the ground (such as the metal ceiling right there), touch the other three wires with the red probe. Only one of the three will result in the multi-meter showing ~12 volts, that's your always-on positive wire. Then, turn the engine on and probe the two remaining wires. The one that now results in the multi-meter showing ~12 volts is the switched positive wire. The last wire is ground.

Even though the harness has more than three wires, from what I remember the connector in the ceiling only has three of them connected so I ignored the others.

The RedTiger harness has stickers that show where it expects each of the three.
 
Last edited:
  • Like
Reactions: JCP

JCP

TRD Off-Road Premium
Well-known member
First Name
James
Joined
Jul 1, 2025
Threads
2
Messages
63
Reaction score
16
Location
Bay Area
Vehicle(s)
2026 4runner TRD Offroad Premium
Not obvious, but easy to figure out with a multimeter.

I cut the Subaru harness in the middle and plugged it into the connector in the ceiling. Making sure the black wire of the multimeter has a good connection to the ground (such as the metal ceiling right there), touch the other three wires with the red probe. Only one of the three will result in the multi-meter showing ~12 volts, that's your always-on positive wire. Then, turn the engine on and probe the two remaining wires. The one that now results in the multi-meter showing ~12 volts is the switched positive wire. The last wire is ground.

Even though the harness has more than three wires, from what I remember the connector in the ceiling only has three of them connected so I ignored the others.

The RedTiger harness has stickers that show where it expects each of the three.
Thank you!
 

Yoli

TRD Off-Road Premium
Active member
First Name
Yoli
Joined
May 15, 2026
Threads
3
Messages
39
Reaction score
6
Location
Portland, OR
Vehicle(s)
2026 4Runner ORP, 2007 4Runner Ltd
Nice write up on the wiring to the back door. Maybe I'm missing something here, but why the elaborate wiring harness for power, when Dongar makes an adapter that uses the plug for the Toyota dashcam? Was it price or some other reason - maybe always on? That's not a bad idea.
 
Last edited:
OP
OP
shine

shine

Trailhunter
Well-known member
First Name
Chris
Joined
Mar 8, 2025
Threads
4
Messages
231
Reaction score
219
Location
Seattle
Vehicle(s)
2025 4Runner Trailhunter, 2008 4Runner SR5
why the elaborate wiring harness for power, when Dongar makes an adapter that uses the plug for the Toyota dashcam?
Multiple reasons why I went this route, mostly:
  • From what I understand, the Dongar adapter works by making the dash cam think that the car is still running when it is really turned off and parked. It will then keep it in this mode for some time and then cut power shutting the dash cam off. WIth this you will lose the ability for the dash cam to react to impacts when parked, and instead you will end up filling up your memory cards with video of where you're parked. They might have improved this since I researched it, haven't looked back at it.
  • The adapter is just one more point of failure. Not a ding on Dongar quality, but all components can fail and adding a component just increases the overall risk of failure and makes troubleshooting harder.
  • Even with the Dongar adapter I would have to pull power from somewhere, so not seeing that it adds a benefit when there's alreay a place where Toyota engineers provide power specifically for a dash cam.
Identifying and connecting three conductors from the Subaru harness and matching them with the wiring harness that came with the dashcam isn't a big deal to me. Not everyone is comfortable doing this, and then adding an adapter might be a better solution. It's always good to have options!
 

JCP

TRD Off-Road Premium
Well-known member
First Name
James
Joined
Jul 1, 2025
Threads
2
Messages
63
Reaction score
16
Location
Bay Area
Vehicle(s)
2026 4runner TRD Offroad Premium
Not obvious, but easy to figure out with a multimeter.

I cut the Subaru harness in the middle and plugged it into the connector in the ceiling. Making sure the black wire of the multimeter has a good connection to the ground (such as the metal ceiling right there), touch the other three wires with the red probe. Only one of the three will result in the multi-meter showing ~12 volts, that's your always-on positive wire. Then, turn the engine on and probe the two remaining wires. The one that now results in the multi-meter showing ~12 volts is the switched positive wire. The last wire is ground.

Even though the harness has more than three wires, from what I remember the connector in the ceiling only has three of them connected so I ignored the others.

The RedTiger harness has stickers that show where it expects each of the three.
What gauge spade connectors did you use? Found some on Amazon 22-14 awg...
 

BonRunner

TRD Sport Premium
Well-known member
Joined
Dec 2, 2025
Threads
10
Messages
345
Reaction score
363
Location
Montana
Vehicle(s)
2026 TRD Sport Premium / WCP
Multiple reasons why I went this route, mostly:
  • From what I understand, the Dongar adapter works by making the dash cam think that the car is still running when it is really turned off and parked. It will then keep it in this mode for some time and then cut power shutting the dash cam off. WIth this you will lose the ability for the dash cam to react to impacts when parked, and instead you will end up filling up your memory cards with video of where you're parked. They might have improved this since I researched it, haven't looked back at it.
  • The adapter is just one more point of failure. Not a ding on Dongar quality, but all components can fail and adding a component just increases the overall risk of failure and makes troubleshooting harder.
  • Even with the Dongar adapter I would have to pull power from somewhere, so not seeing that it adds a benefit when there's alreay a place where Toyota engineers provide power specifically for a dash cam.
Identifying and connecting three conductors from the Subaru harness and matching them with the wiring harness that came with the dashcam isn't a big deal to me. Not everyone is comfortable doing this, and then adding an adapter might be a better solution. It's always good to have options!
Dongar adapter has 3 modes for power:

- Ignition - camera on/off when car on/off.
- Time - You set how much time, in hours, after car off for the camera to keep working. You can adjust it on the adapter directly when need.
- Continuous - Camera continuously runs when car off until battery drops to safe level to start, between 12V-13V, for it to cut off the camera.

I use Continuous mode for 8 months with no problem on my FitcamX. Car always start on first try even in -10°F winter. It records up to 6 hours at one time when I was camping. Now, I just set to Time mode at 2 hours for day to day stuff.
 

JCP

TRD Off-Road Premium
Well-known member
First Name
James
Joined
Jul 1, 2025
Threads
2
Messages
63
Reaction score
16
Location
Bay Area
Vehicle(s)
2026 4runner TRD Offroad Premium
Dongar adapter has 3 modes for power:

- Ignition - camera on/off when car on/off.
- Time - You set how much time, in hours, after car off for the camera to keep working. You can adjust it on the adapter directly when need.
- Continuous - Camera continuously runs when car off until battery drops to safe level to start, between 12V-13V, for it to cut off the camera.

I use Continuous mode for 8 months with no problem on my FitcamX. Car always start on first try even in -10°F winter. It records up to 6 hours at one time when I was camping. Now, I just set to Time mode at 2 hours for day to day stuff.
Which Dongar do you have? Sounds like the Pro or the Pro+
 

JCP

TRD Off-Road Premium
Well-known member
First Name
James
Joined
Jul 1, 2025
Threads
2
Messages
63
Reaction score
16
Location
Bay Area
Vehicle(s)
2026 4runner TRD Offroad Premium
Now to the hardest part, getting the cable through the rubber hose between the back of the roof and the door. I pushed my coat hanger tool from the left to the right, very carefully to not damage any of the other wires in the rubber hose, and after disconnecting it from both the door and the roof of the car. This is also the only place where I damaged any part of the car, one of the tabs on the white plastic part securing the rubber hose to the roof broke off. Not too worried, was able to seat the part sufficiently after I finished the install. Reconnect the hose back after you've put the wire through.
IMG_7251.webp


Decided to install a Blackvue Elite 9. Got all the way to this point and had to stop because I couldn't figure out how to fish the wire through the rubber hose, and it was getting dark out. I'm guessing the spoiler needs to be removed for access.

So far, I lifted both ends like you did in the photo, but on the left side that is attached to the rear liftgate there is no opening. The rubber hose is continuously sealed through the plastic opening, then black tape wrapped around the wire bundle through the metal opening. No access that I can see. Did you remove the spoiler in order to push the coat hanger tool through?

By the way, thank you for the wire testing instructions. It made the process nice and easy.
Sponsored


Top