
- Thread starter
- #1
Hey all,
I recently got the Rigid Industries D-SS Spot A-Pillar kit and while I was doing my research, I didn't find any guides specific to these ones, nor did I feel there were any good guides on YouTube or anywhere else either. The install took me about an hour or so, and I had two other people helping me (you really only need one other person to help you, and thats to hold the hood to make sure it doesn't get misaligned). I want to go step-by-step to show people how I did this and wired it up so hopefully it helps other people.
****DISCLAIMER****
I am not a professional. I am telling you what worked for me and how I did it. This is not meant to be an "official" guide by any means, and as much as I hope this helps you, install at your own risk.
Now that is out of the way, we can get into the install guide. I won't have pictures for every part of the install, but I should have enough that it makes it relatively easy to follow. IF you really need a picture of some part of the install to see how it looks, let me know and I'll post a picture in the thread as soon as I can.
Vehicle: 2025 4Runner TRD Off Road Premium I-Force Max WITH Factory Aux Switches (THIS GUIDE WILL NOT HELP YOU IF YOU DO NOT HAVE THE FACTORY AUX SWITCHES)
Parts you need that were not included in kit:
Electrical Tape
Crimp/Heat Shrink tubing
extra 2 feet of red (hot wire) and black or white (ground) wire (I used white wire, worked fine).
zip ties
pigtail cable from Toyota (I believe that the TRD Pro and Trailhunter come with this from factory, but it only cost me about $17 + tax at Toyota).
First thing I did before I started the install was wire up the lights to make sure they worked, I would recommend doing that before installing anything. Last thing you want to do is install the lights all the way just to find out they don't work.
1. DISCONNECT THE BATTERY - I will be honest with you, I don't know enough to know if disconnecting the battery is absolutely required, but better safe than sorry.
2. . I installed the mounts to the hood first, and then lights to mounts - I don't have pictures of this, but it's fairly straightforward. The hood is held down by 4 bolts, 2 on each side. I removed one bolt at a time, put on the mount, hand tightened it just enough so I could move it, removed the other bolt and finished one side like that, repeated for the other side. I did it one bolt at a time to try to keep the hood from moving out of alignment, however mine still did. I would HIGHLY recommend you have someone with you to hold the hood as the hood pops out of alignment fairly easy. This is not a big deal, it was a matter of just loosening the bolts and having the person who was with me shift the hood (in my case to the right) while I tightened the bolts back down and it was back in alignment pretty easy. To be honest, this was probably the hardest step in the process. Once I got the mounts put on, I installed the lights using the instructions that came with the kit.
3. Install the pig tail - This is easy, the hardest part if getting the weather cap off. I do not have a picture of this, but if you consult the owners manual, it tells you where the two connections are in the engine compartment. There are two, a "hi aux wire harness" and a "lo aux wire harness". To be honest, I'm going to butcher what the difference is between the two, but I got the "hi aux wire harness" and had no issues. You can probably get the "lo aux wire harness" and it will work just fine, but research first. When you find the place to install the pig tail, there are two of them, one fits the lo aux wire harness, the other fits the hi aux wire harness. If you are standing in front of the car and looking down at them, the one in the back is for the hi, and the one in the front is for the lo. You need to take the weather cap off (I had to use pliers to get it off) and then once it's off, the pigtail harness just clicks right into place.
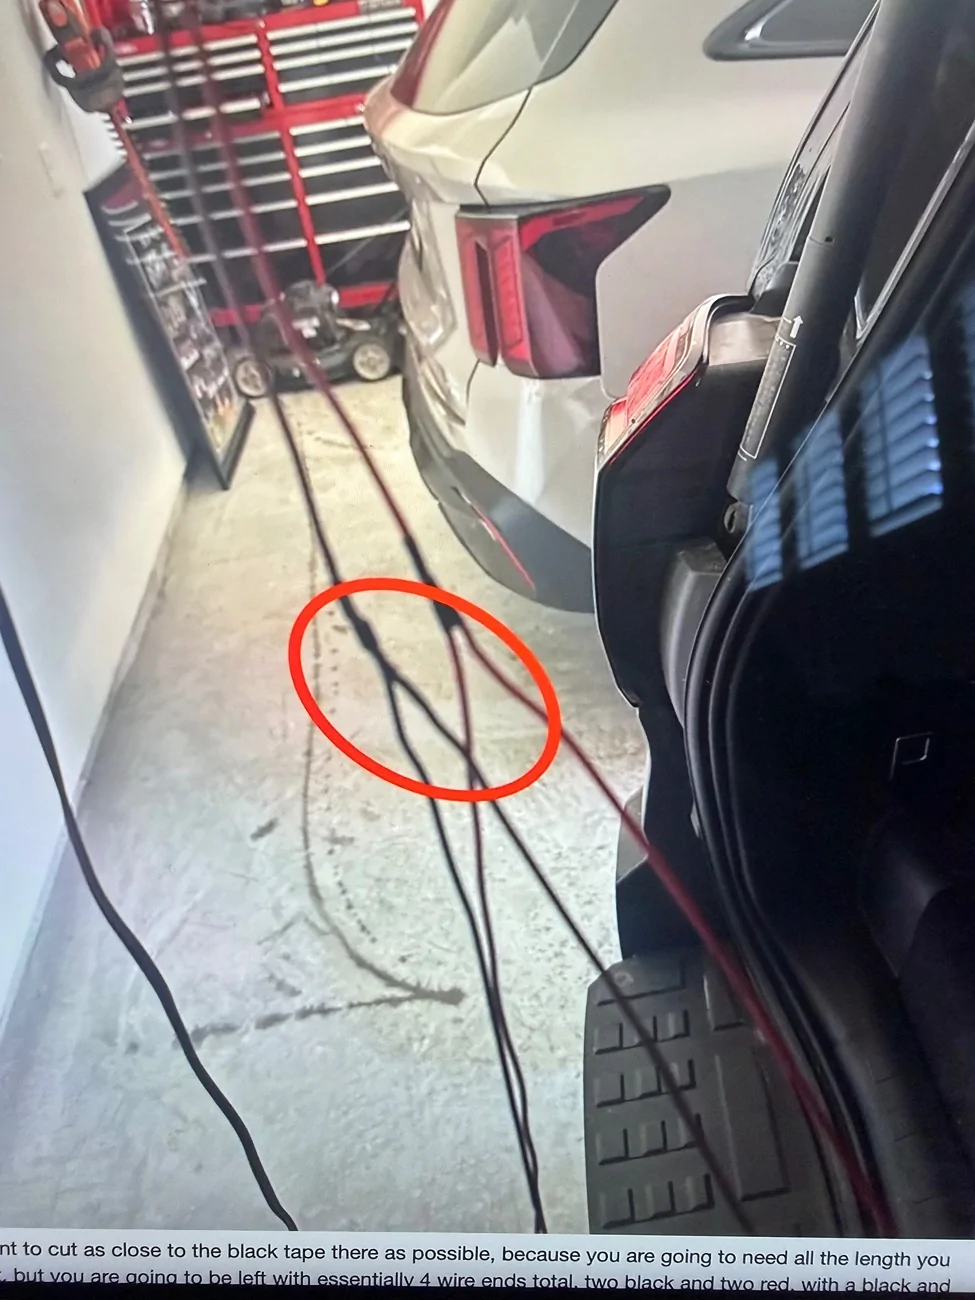
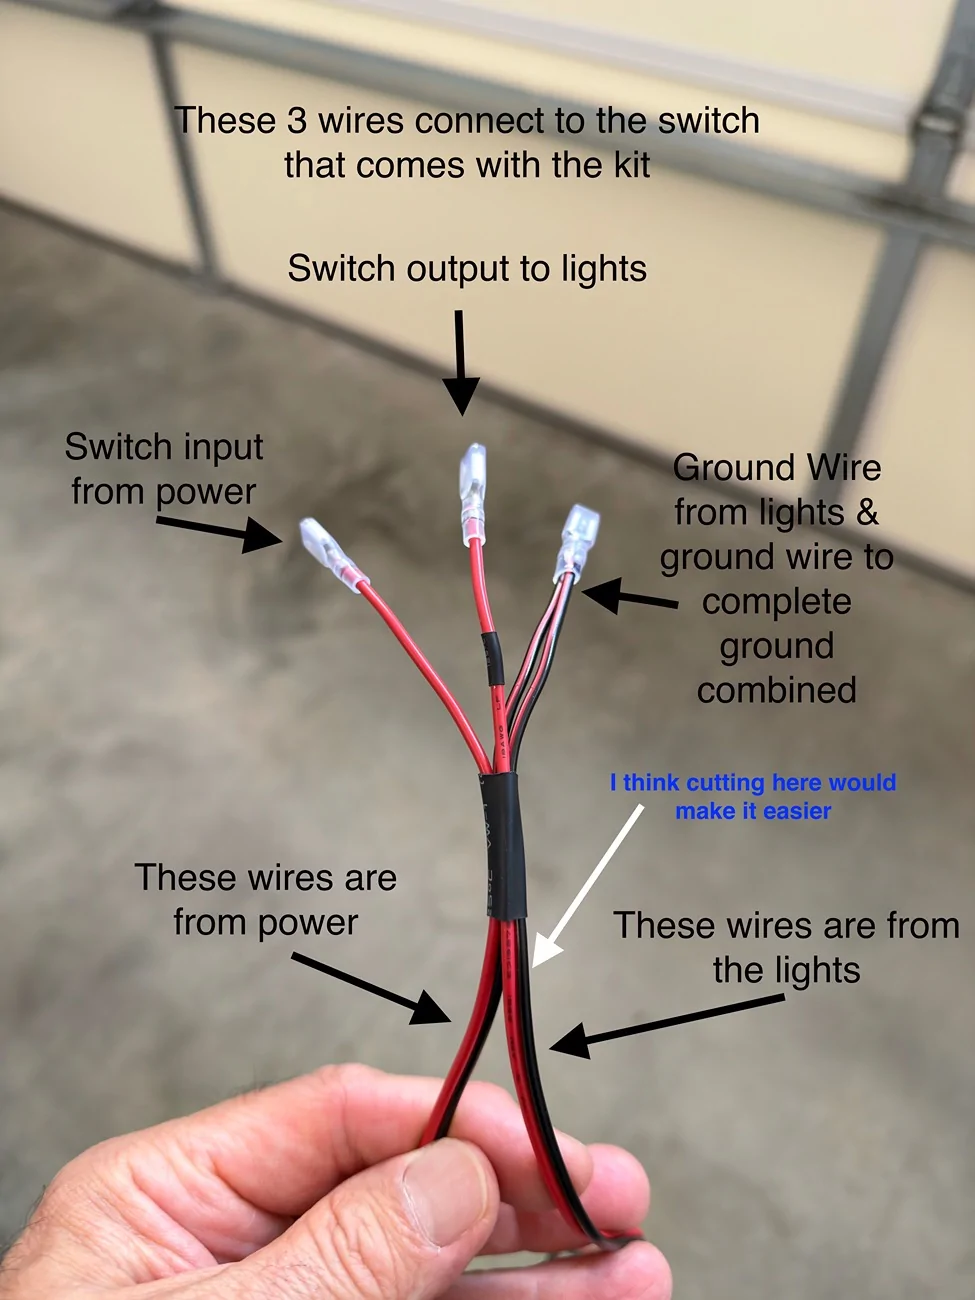
4. Cut wire harness - The specific kit I got was this one https://www.rigidindustries.com/toyota-4runner-25-d-ss-spot-a-pillar-kit.html which came with the wire harness. This wire harness comes with its own relay and switch. Because I had the factory aux switches, I did not need the relay and switch (again, if you do not have the factory aux switches, this guide will not help you, and if you cut your harness, you WILL cost yourself money). What I had to do with the harness was cut away the relay portion the harness, you can see where I cut in the picture shown below

You want to cut as close to the black tape there as possible, because you are going to need all the length you can get, but you are going to be left with essentially 4 wire ends total, two black and two red, with a black and red going to each light. the part you cut away is now trash, keep it if you want or throw it away, more power to you.
5. Figure out which Aux you are going to wire to, and which color that corresponds to on the pigtail - The owners manual is your best friend at this step. Each aux switch has its own amperage, and the owners manual tells you which color pigtail to hook up to based on the amperage. These ditch lights are fairly low amperage so I ended up using aux 2. As you can see below, because I used aux 2, the red wire from the pigtail was my "hot" wire and the black/white wire from my pigtail was the ground wire. Again, consult the owners manual as it may be different if you use a different aux switch than I did.
6. Attach the wires to the pigtail - This may sound complicated but it's not. Once you have the lights installed on the mounts, you are going to plug in the grey connectors and then you will need to attach the wires to the pigtail. For the drivers side, the wire is long enough that it will reach the pigtail no problem. I found that I had to strip some insulation off of the pigtail and then also the wires coming from the lights using a wire stripper/cutter tool because there wasn't enough wire sticking out, but this was fairly easy. Once I exposed more of the wire (maybe a half inch more, if that) I just wrapped them around each other to test that the electrical was working first, as pictured below
and when I turned the car on, the lights came on when I pressed aux 2. At this step, if you test the lights and they don't come on, I would go back and make sure that you followed the previous steps correctly. There was really no troubleshooting for me here. once I connected the wires like so, lights turned on right away as soon as I pressed aux 2.
For the passenger side, this is where I needed the extra 2 feet of hot and ground wire as the wire that comes from the lights is not long enough to reach across the engine bay to connect to the pigtail harness. I bought 16GA (16 gauge) wire. I just went to ace hardware, bought two feet of red wire, and two feet of white wire (I was told that the color doesn't matter as long as you know which is hot and which is ground, but I don't know enough myself to verify if that claim is true or not, but the extra red and white wire I bought worked great for me with no issues). I removed some extra insulation off each wire, wrapped the extra wire to the wire coming from the lights, and then the other side of the extra wire, I wrapped around the pigtail and tested again to make sure those lights come on, which they did the first time with no issue.
7. Crimp/heat shrink tubing to connect wires together - once I verified all the connections worked, I used the heat shrink tubing to make the wire connections permanent. Again, this was pretty easy even if you've never done it before (which I hadn't). You just put each end into the heat shrink tubing, crimp it and then heat shrink it to create a watertight seal. You can see what I'm talking about in the picture below
(in that picture, I had not yet crimped/heat sealed it, but you can see what I'm talking about with the wires going into each end) Once all this was done, I verified one more time that the lights still worked, and then I zip tied everything down. I used the electrical tape to just cover up any exposed wiring that wasn't covered by the heat shrink tubing.
8. zip tying the wires - this is fairly self explanatory and very much a "create your own adventure" thing. There isn't a right way to do this, but you can see how I chose to route the wires in this picture (a bit hard to see, so I'll highlight as best I can where my wires are routed)
Once you zip tied down, you're done! The switch that came with the kit can be kept or thrown away, more power to you.
To whomever stumbles across this, I hope this is helpful. As I said above, let me know if there are any pictures you need and I will get them to you. It may not be right away, but I will do my best to get them to you as soon as possible.
Let me know if there are any questions or further clarification needed!
I recently got the Rigid Industries D-SS Spot A-Pillar kit and while I was doing my research, I didn't find any guides specific to these ones, nor did I feel there were any good guides on YouTube or anywhere else either. The install took me about an hour or so, and I had two other people helping me (you really only need one other person to help you, and thats to hold the hood to make sure it doesn't get misaligned). I want to go step-by-step to show people how I did this and wired it up so hopefully it helps other people.
****DISCLAIMER****
I am not a professional. I am telling you what worked for me and how I did it. This is not meant to be an "official" guide by any means, and as much as I hope this helps you, install at your own risk.
Now that is out of the way, we can get into the install guide. I won't have pictures for every part of the install, but I should have enough that it makes it relatively easy to follow. IF you really need a picture of some part of the install to see how it looks, let me know and I'll post a picture in the thread as soon as I can.
Vehicle: 2025 4Runner TRD Off Road Premium I-Force Max WITH Factory Aux Switches (THIS GUIDE WILL NOT HELP YOU IF YOU DO NOT HAVE THE FACTORY AUX SWITCHES)
Parts you need that were not included in kit:
Electrical Tape
Crimp/Heat Shrink tubing
extra 2 feet of red (hot wire) and black or white (ground) wire (I used white wire, worked fine).
zip ties
pigtail cable from Toyota (I believe that the TRD Pro and Trailhunter come with this from factory, but it only cost me about $17 + tax at Toyota).
First thing I did before I started the install was wire up the lights to make sure they worked, I would recommend doing that before installing anything. Last thing you want to do is install the lights all the way just to find out they don't work.
1. DISCONNECT THE BATTERY - I will be honest with you, I don't know enough to know if disconnecting the battery is absolutely required, but better safe than sorry.
2. . I installed the mounts to the hood first, and then lights to mounts - I don't have pictures of this, but it's fairly straightforward. The hood is held down by 4 bolts, 2 on each side. I removed one bolt at a time, put on the mount, hand tightened it just enough so I could move it, removed the other bolt and finished one side like that, repeated for the other side. I did it one bolt at a time to try to keep the hood from moving out of alignment, however mine still did. I would HIGHLY recommend you have someone with you to hold the hood as the hood pops out of alignment fairly easy. This is not a big deal, it was a matter of just loosening the bolts and having the person who was with me shift the hood (in my case to the right) while I tightened the bolts back down and it was back in alignment pretty easy. To be honest, this was probably the hardest step in the process. Once I got the mounts put on, I installed the lights using the instructions that came with the kit.
3. Install the pig tail - This is easy, the hardest part if getting the weather cap off. I do not have a picture of this, but if you consult the owners manual, it tells you where the two connections are in the engine compartment. There are two, a "hi aux wire harness" and a "lo aux wire harness". To be honest, I'm going to butcher what the difference is between the two, but I got the "hi aux wire harness" and had no issues. You can probably get the "lo aux wire harness" and it will work just fine, but research first. When you find the place to install the pig tail, there are two of them, one fits the lo aux wire harness, the other fits the hi aux wire harness. If you are standing in front of the car and looking down at them, the one in the back is for the hi, and the one in the front is for the lo. You need to take the weather cap off (I had to use pliers to get it off) and then once it's off, the pigtail harness just clicks right into place.
4. Cut wire harness - The specific kit I got was this one https://www.rigidindustries.com/toyota-4runner-25-d-ss-spot-a-pillar-kit.html which came with the wire harness. This wire harness comes with its own relay and switch. Because I had the factory aux switches, I did not need the relay and switch (again, if you do not have the factory aux switches, this guide will not help you, and if you cut your harness, you WILL cost yourself money). What I had to do with the harness was cut away the relay portion the harness, you can see where I cut in the picture shown below
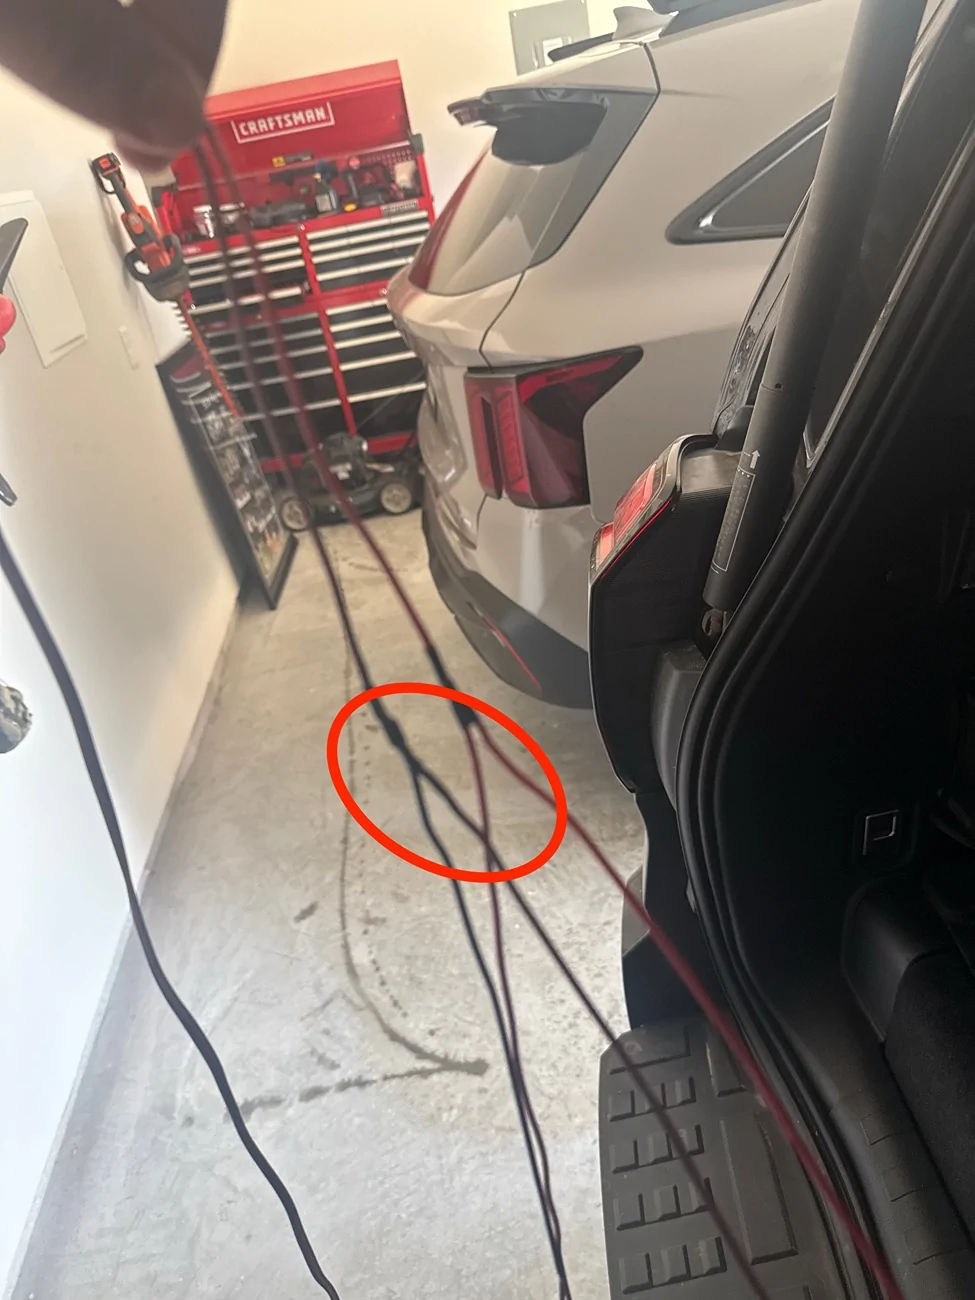
You want to cut as close to the black tape there as possible, because you are going to need all the length you can get, but you are going to be left with essentially 4 wire ends total, two black and two red, with a black and red going to each light. the part you cut away is now trash, keep it if you want or throw it away, more power to you.
5. Figure out which Aux you are going to wire to, and which color that corresponds to on the pigtail - The owners manual is your best friend at this step. Each aux switch has its own amperage, and the owners manual tells you which color pigtail to hook up to based on the amperage. These ditch lights are fairly low amperage so I ended up using aux 2. As you can see below, because I used aux 2, the red wire from the pigtail was my "hot" wire and the black/white wire from my pigtail was the ground wire. Again, consult the owners manual as it may be different if you use a different aux switch than I did.
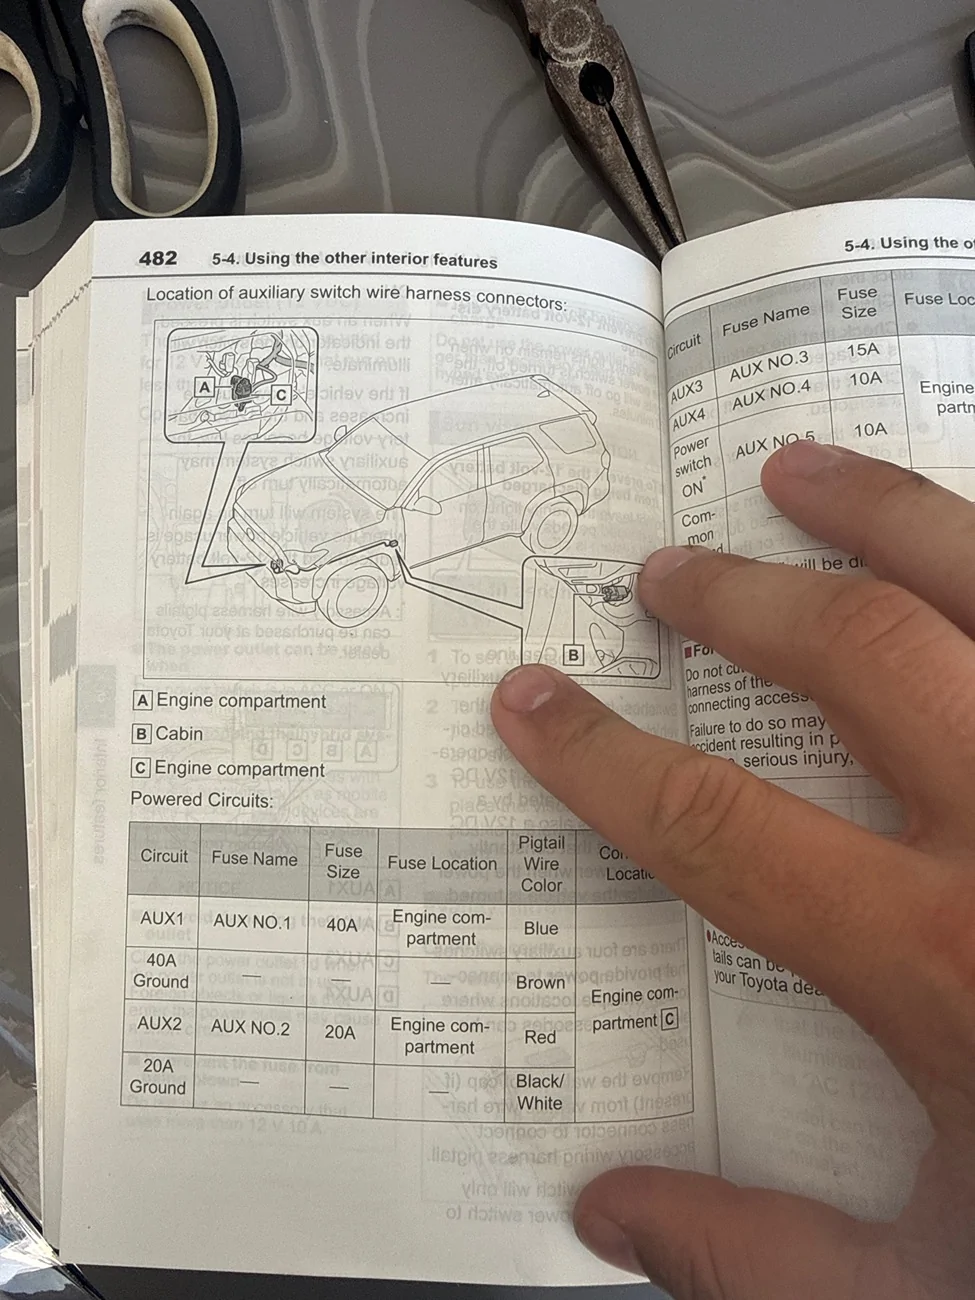
6. Attach the wires to the pigtail - This may sound complicated but it's not. Once you have the lights installed on the mounts, you are going to plug in the grey connectors and then you will need to attach the wires to the pigtail. For the drivers side, the wire is long enough that it will reach the pigtail no problem. I found that I had to strip some insulation off of the pigtail and then also the wires coming from the lights using a wire stripper/cutter tool because there wasn't enough wire sticking out, but this was fairly easy. Once I exposed more of the wire (maybe a half inch more, if that) I just wrapped them around each other to test that the electrical was working first, as pictured below
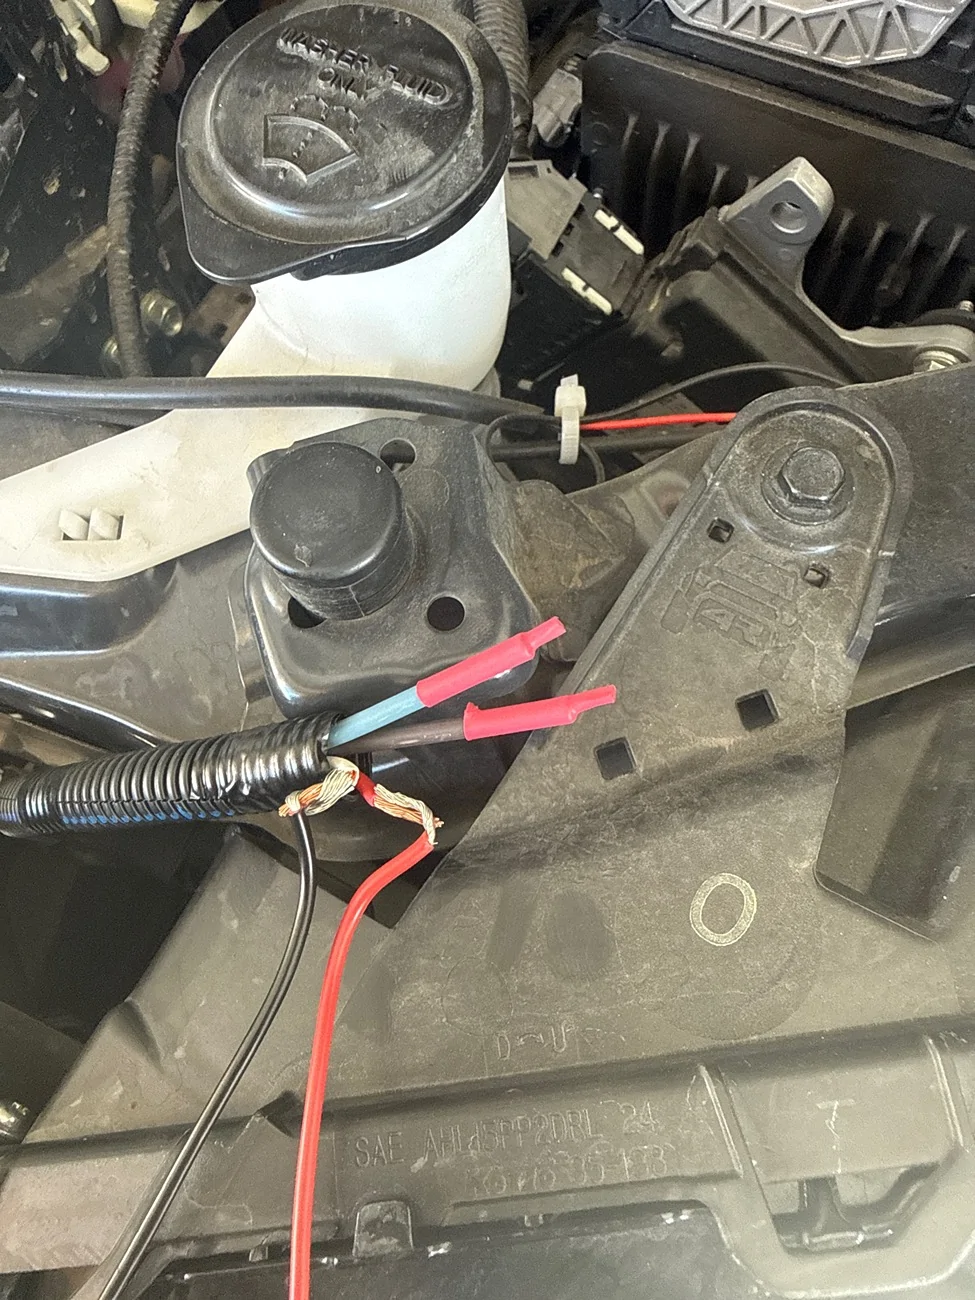
and when I turned the car on, the lights came on when I pressed aux 2. At this step, if you test the lights and they don't come on, I would go back and make sure that you followed the previous steps correctly. There was really no troubleshooting for me here. once I connected the wires like so, lights turned on right away as soon as I pressed aux 2.
For the passenger side, this is where I needed the extra 2 feet of hot and ground wire as the wire that comes from the lights is not long enough to reach across the engine bay to connect to the pigtail harness. I bought 16GA (16 gauge) wire. I just went to ace hardware, bought two feet of red wire, and two feet of white wire (I was told that the color doesn't matter as long as you know which is hot and which is ground, but I don't know enough myself to verify if that claim is true or not, but the extra red and white wire I bought worked great for me with no issues). I removed some extra insulation off each wire, wrapped the extra wire to the wire coming from the lights, and then the other side of the extra wire, I wrapped around the pigtail and tested again to make sure those lights come on, which they did the first time with no issue.
7. Crimp/heat shrink tubing to connect wires together - once I verified all the connections worked, I used the heat shrink tubing to make the wire connections permanent. Again, this was pretty easy even if you've never done it before (which I hadn't). You just put each end into the heat shrink tubing, crimp it and then heat shrink it to create a watertight seal. You can see what I'm talking about in the picture below
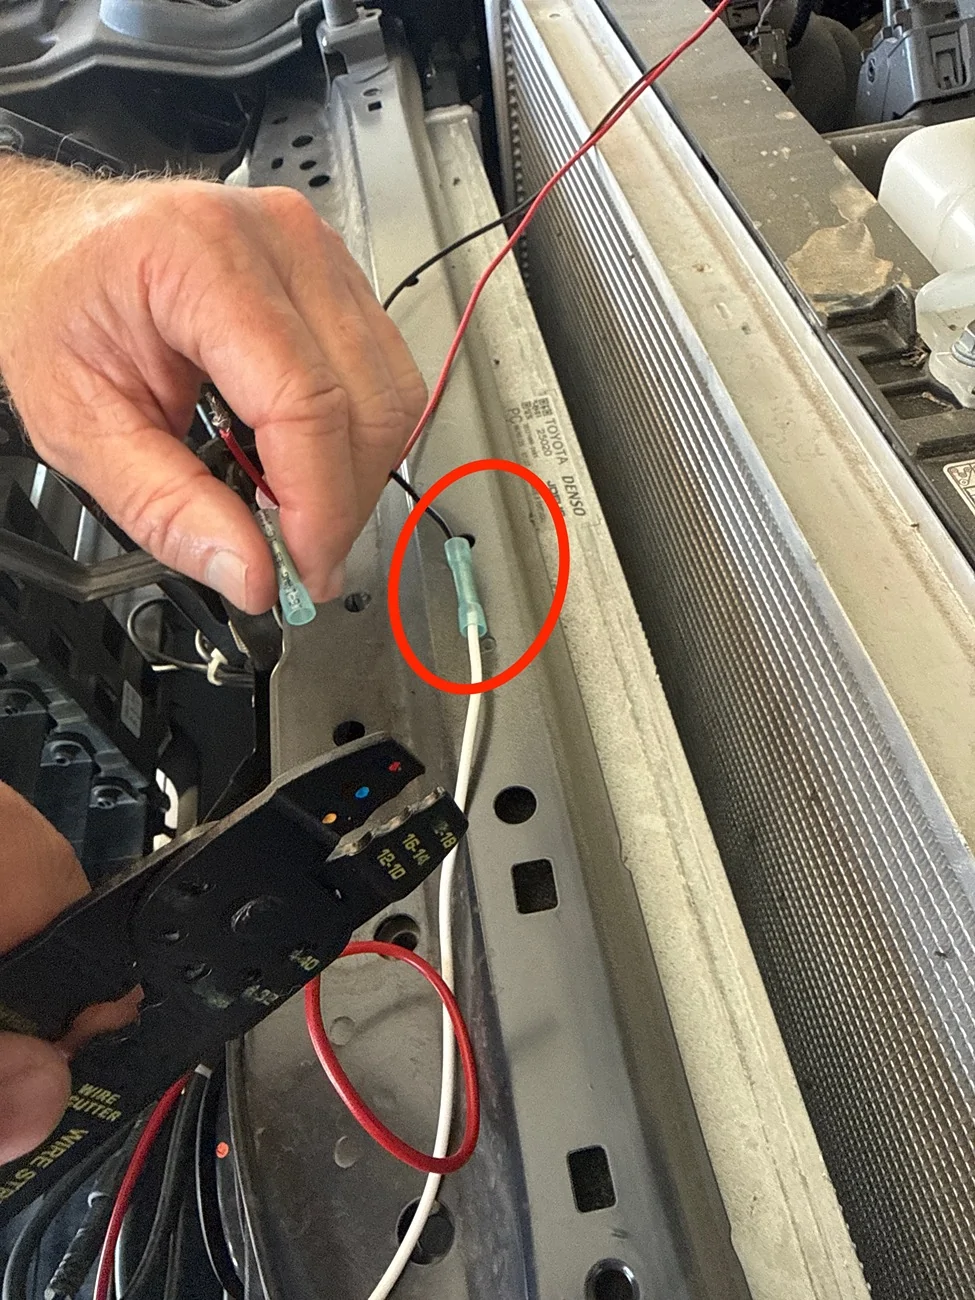
(in that picture, I had not yet crimped/heat sealed it, but you can see what I'm talking about with the wires going into each end) Once all this was done, I verified one more time that the lights still worked, and then I zip tied everything down. I used the electrical tape to just cover up any exposed wiring that wasn't covered by the heat shrink tubing.
8. zip tying the wires - this is fairly self explanatory and very much a "create your own adventure" thing. There isn't a right way to do this, but you can see how I chose to route the wires in this picture (a bit hard to see, so I'll highlight as best I can where my wires are routed)
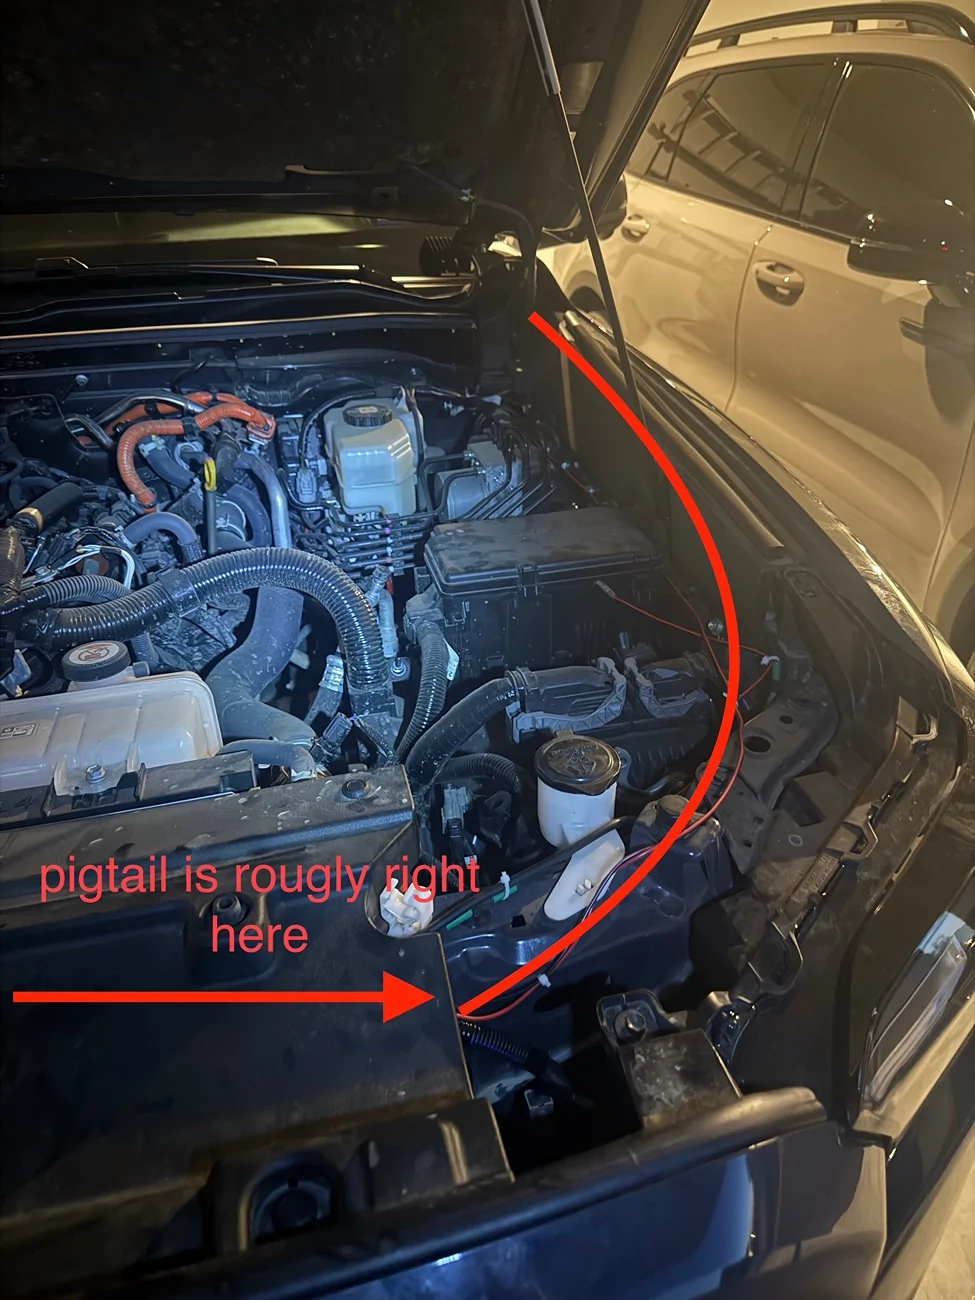
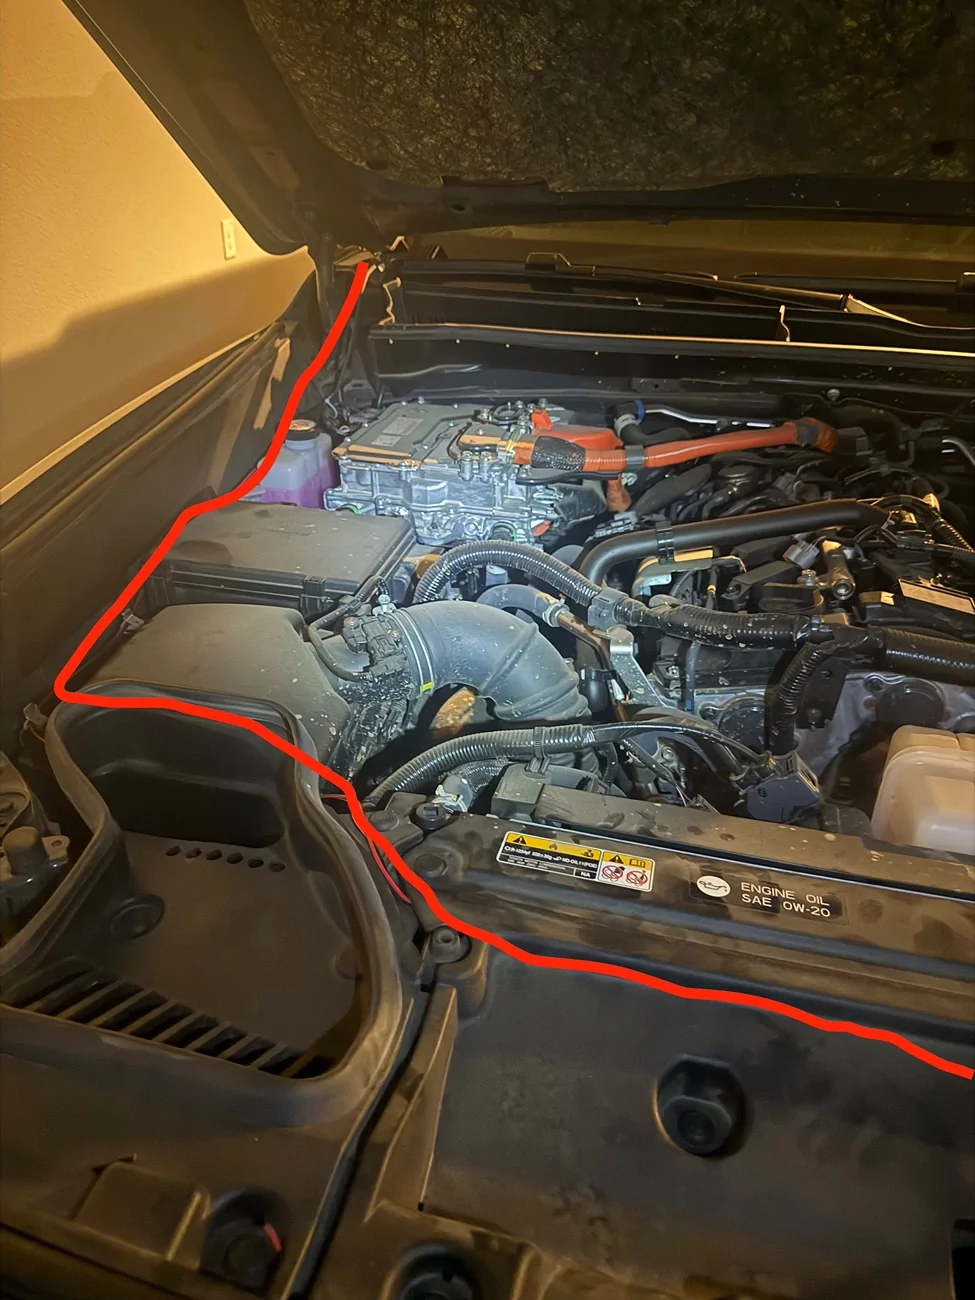
Once you zip tied down, you're done! The switch that came with the kit can be kept or thrown away, more power to you.
To whomever stumbles across this, I hope this is helpful. As I said above, let me know if there are any pictures you need and I will get them to you. It may not be right away, but I will do my best to get them to you as soon as possible.
Let me know if there are any questions or further clarification needed!
Sponsored
Last edited: