
Sponsored

Mounting Starlink Mini to OEM Trailhunter Rack

bobholthaus

Well-known member
First Name
Bob
Joined
Apr 10, 2024
Threads
8
Messages
96
Reaction score
34
Location
St. Louis MO
Vehicle(s)
Jeep JL-370 AEV Diesel
Hello community: I bought a Starlink Mini today and have a Trailhunter that is stuck in "inspection"; I'm hoping it's here sooner than later. I want to mount the Mini to the OEM rack as low profile as possible (not permanently, but for road trips). Can you give me some good suggestions on which mount to use? Thanks!
Sponsored

 

mtk_rob

Trailhunter
Well-known member
First Name
Rob
Joined
Aug 10, 2025
Threads
2
Messages
52
Reaction score
53
Location
New York
Vehicle(s)
2025 4runner Trailhunter
i just have a magnetic starlink mini holder that sits over the passenger side in front of the rack. the rack is 3/4 size so it sits pretty far back. will attach a photo when i think of it.
 

Peppoh

TRD Off-Road Premium
Member
First Name
Gigi
Joined
Nov 2, 2025
Threads
5
Messages
11
Reaction score
6
Location
CA
Vehicle(s)
4Runner 6th
You would check this link, there are several suggestions.
A few of those are easy removable.
https://www.4runner6g.com/forum/threads/starlink-roam-mounting-options.9026/#post-109912

Another good option is the Sherpa mount, expensive and maybe not the best option if you need easy removal, but sturdy.
https://sherpaec.com/products/sherpa-starlink-mini-flush-mounts

I’m still using my custom 3D printed enclosure designed to mount on a 8020 frame rack. Best option for a permanent mount in my opinion. The mounting concept is similar to Sherpa and Strikerfab and even in case of loss of torque, still keeps the enclosure mechanically locked in place.

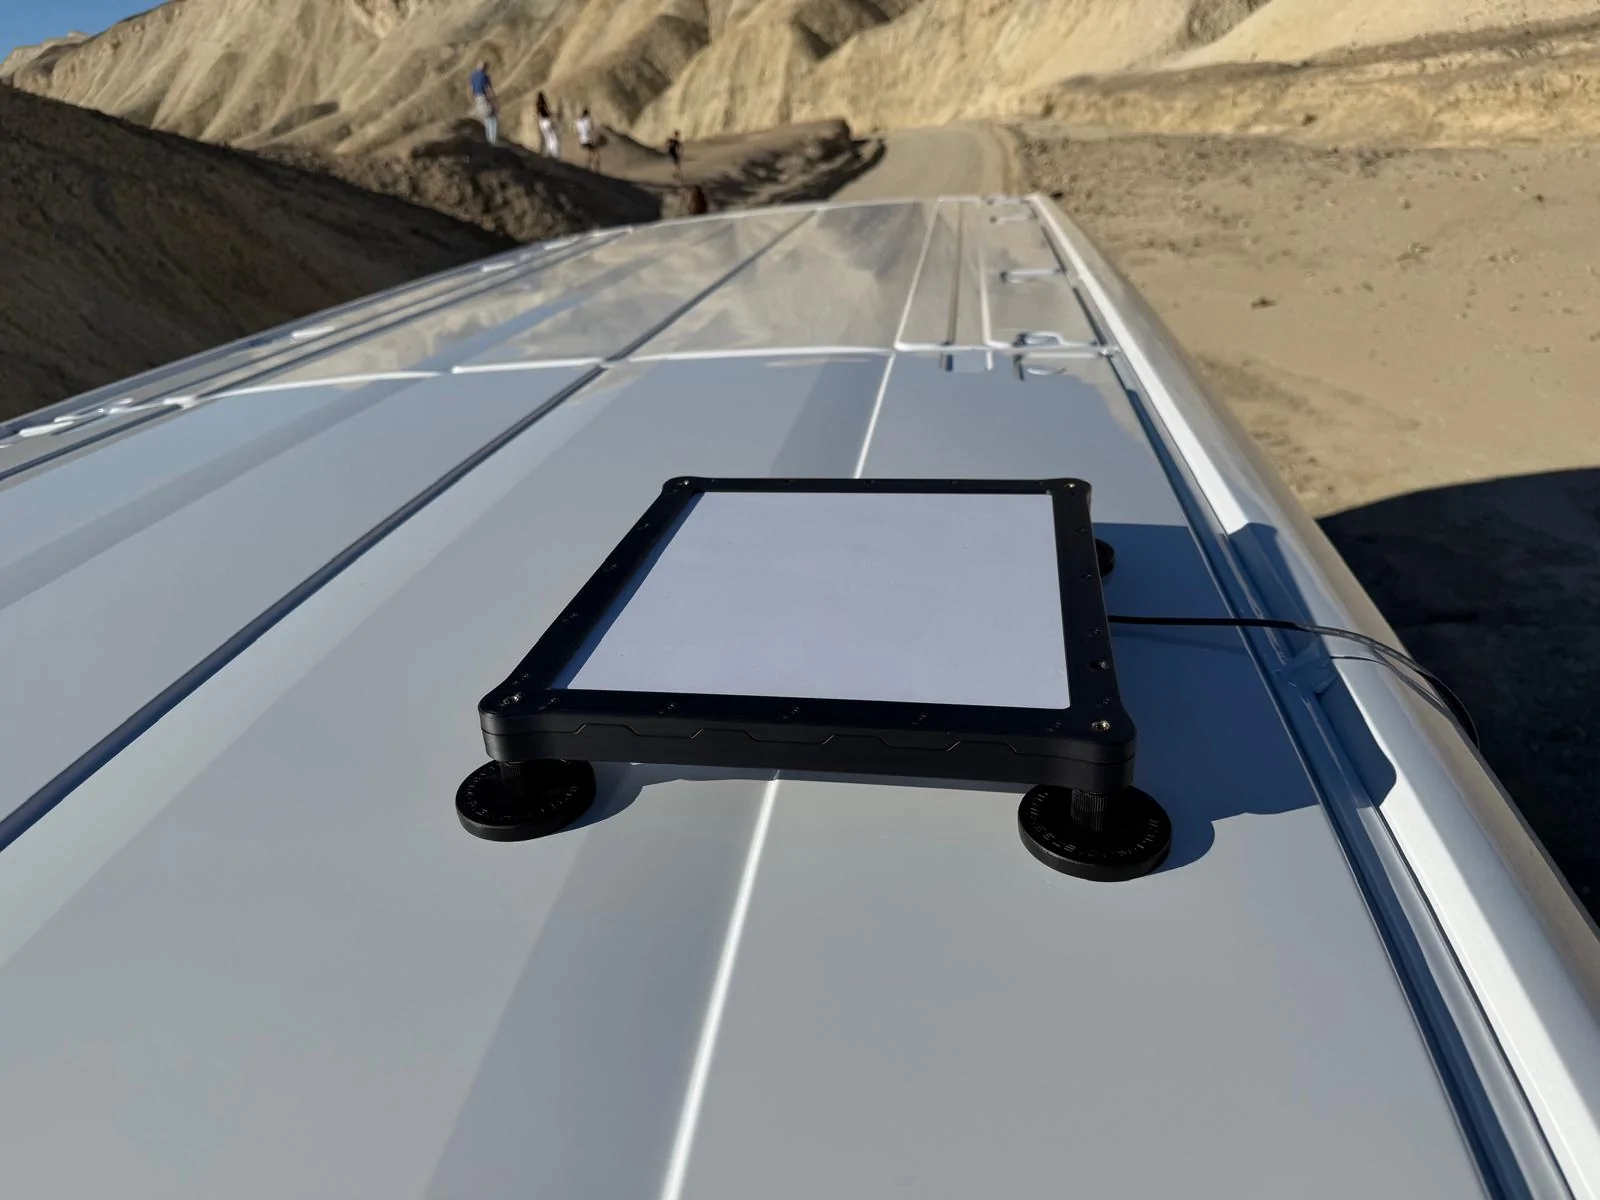
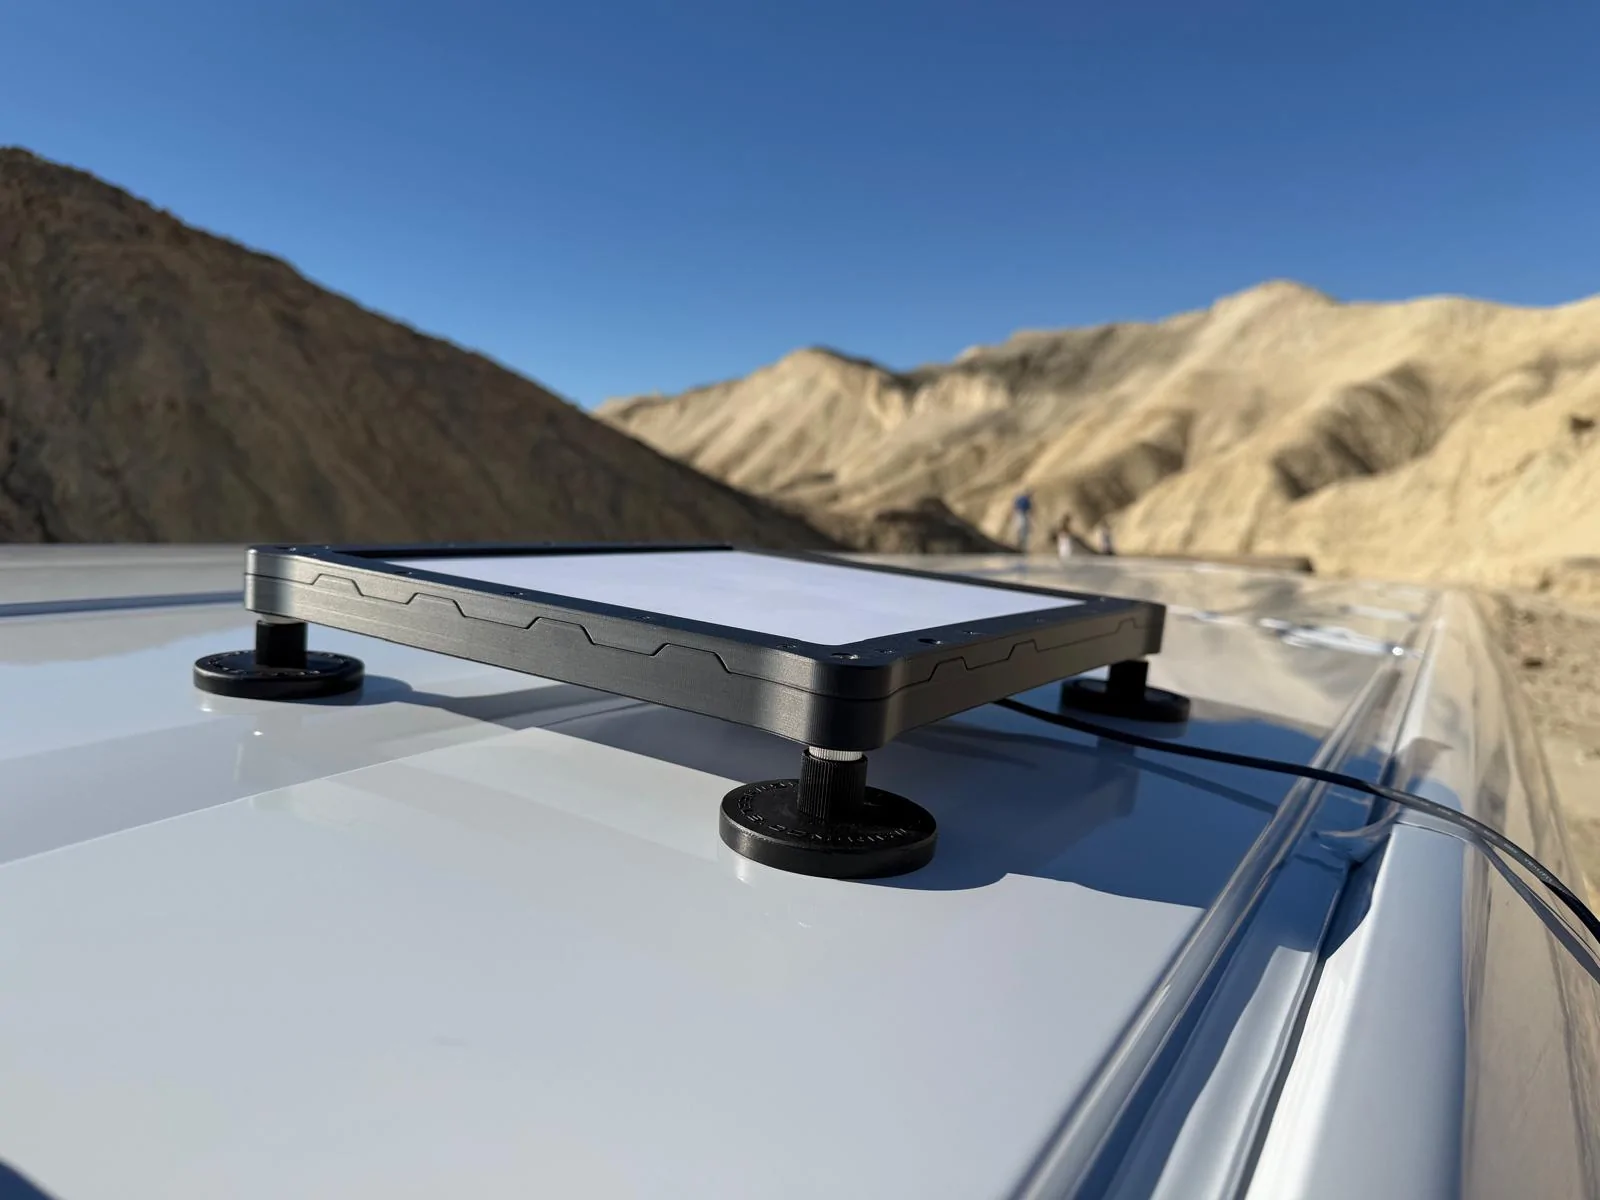
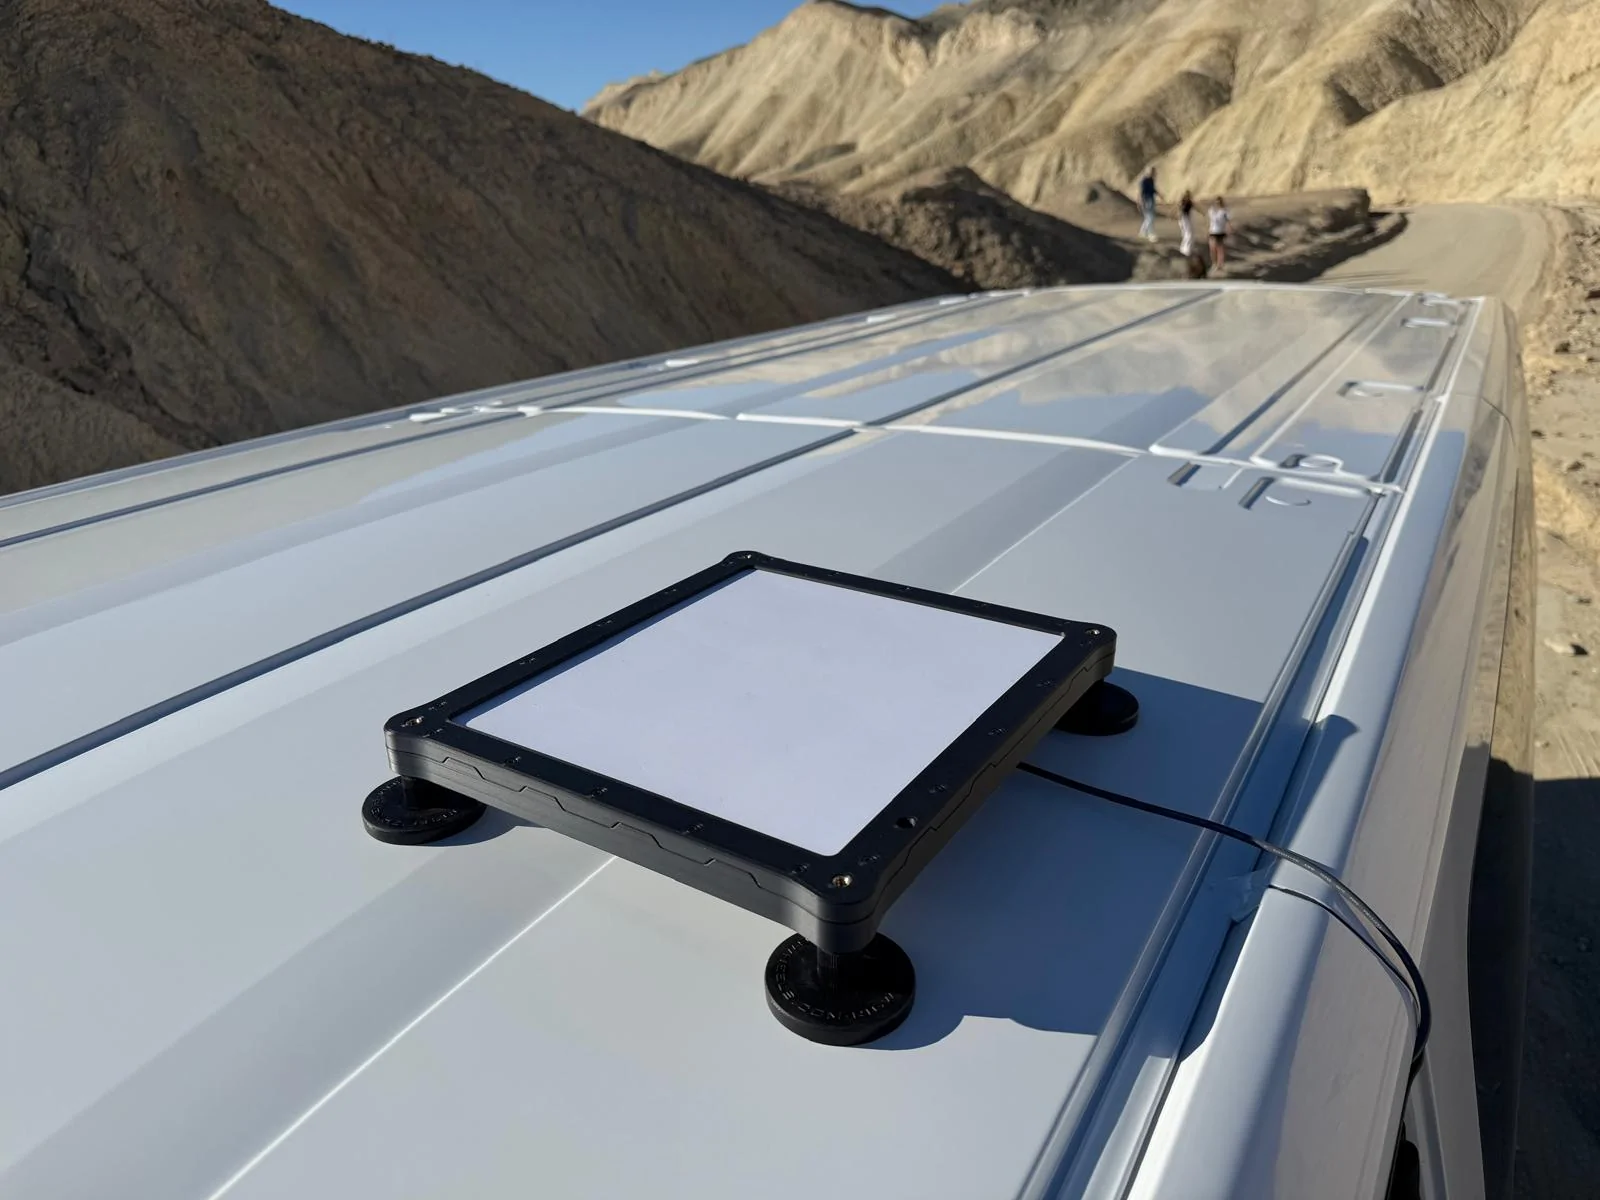
I recently went to a trip with a rental car so I mounted it with magnetic mounts. Regardless of what other people say about magnetic mounts, they worked flawlessly driving at 80 mph completely exposed to air flow and wind gusts. So sturdy that I needed prying tools to remove them from the roof.
I’m attaching a few picture so you get a sense of how low you can go without the risk of scratching the roof. The total depth is 55 mm.

Other options are suction cups, better if piston operated. I tend not to trust those anyway, long term they leak air so you are constantly wondering if they need checking. It is a good option for slow driving, camping, quasi static use.

2025 2026 4runner 6th gen Mounting Starlink Mini to OEM Trailhunter Rack 81ce6ce0-d2ac-404f-b39d-05667f14a41c
2025 2026 4runner 6th gen Mounting Starlink Mini to OEM Trailhunter Rack f7a7cf25-a25d-4e47-81e4-f9a8cab4463f
2025 2026 4runner 6th gen Mounting Starlink Mini to OEM Trailhunter Rack 72898a5d-23fd-48f4-b88e-dc94cf0d232d
 
OP
OP
bobholthaus

bobholthaus

Well-known member
First Name
Bob
Joined
Apr 10, 2024
Threads
8
Messages
96
Reaction score
34
Location
St. Louis MO
Vehicle(s)
Jeep JL-370 AEV Diesel
You would check this link, there are several suggestions.
A few of those are easy removable.
https://www.4runner6g.com/forum/threads/starlink-roam-mounting-options.9026/#post-109912

Another good option is the Sherpa mount, expensive and maybe not the best option if you need easy removal, but sturdy.
https://sherpaec.com/products/sherpa-starlink-mini-flush-mounts

I’m still using my custom 3D printed enclosure designed to mount on a 8020 frame rack. Best option for a permanent mount in my opinion. The mounting concept is similar to Sherpa and Strikerfab and even in case of loss of torque, still keeps the enclosure mechanically locked in place.

I recently went to a trip with a rental car so I mounted it with magnetic mounts. Regardless of what other people say about magnetic mounts, they worked flawlessly driving at 80 mph completely exposed to air flow and wind gusts. So sturdy that I needed prying tools to remove them from the roof.
I’m attaching a few picture so you get a sense of how low you can go without the risk of scratching the roof. The total depth is 55 mm.

Other options are suction cups, better if piston operated. I tend not to trust those anyway, long term they leak air so you are constantly wondering if they need checking. It is a good option for slow driving, camping, quasi static use.

81ce6ce0-d2ac-404f-b39d-05667f14a41c.webp
f7a7cf25-a25d-4e47-81e4-f9a8cab4463f.webp
72898a5d-23fd-48f4-b88e-dc94cf0d232d.webp
Thank you for all of this. I will check out those links. I would like to have a mount up there that I could just leave and have power run up there permanently and when I wanna pop the unit up there I can. I won’t need it up there seven days a week, but I just want an easy solution that’s not going to let it get stolen and it’s going to be secure.
 

SummitSeeker

TRD Off-Road Premium
Active member
Joined
Jan 18, 2026
Threads
8
Messages
32
Reaction score
9
Location
Colorado
Vehicle(s)
2026 4Runner ORP
You would check this link, there are several suggestions.
A few of those are easy removable.
https://www.4runner6g.com/forum/threads/starlink-roam-mounting-options.9026/#post-109912

Another good option is the Sherpa mount, expensive and maybe not the best option if you need easy removal, but sturdy.
https://sherpaec.com/products/sherpa-starlink-mini-flush-mounts

I’m still using my custom 3D printed enclosure designed to mount on a 8020 frame rack. Best option for a permanent mount in my opinion. The mounting concept is similar to Sherpa and Strikerfab and even in case of loss of torque, still keeps the enclosure mechanically locked in place.

I recently went to a trip with a rental car so I mounted it with magnetic mounts. Regardless of what other people say about magnetic mounts, they worked flawlessly driving at 80 mph completely exposed to air flow and wind gusts. So sturdy that I needed prying tools to remove them from the roof.
I’m attaching a few picture so you get a sense of how low you can go without the risk of scratching the roof. The total depth is 55 mm.

Other options are suction cups, better if piston operated. I tend not to trust those anyway, long term they leak air so you are constantly wondering if they need checking. It is a good option for slow driving, camping, quasi static use.

81ce6ce0-d2ac-404f-b39d-05667f14a41c.webp
f7a7cf25-a25d-4e47-81e4-f9a8cab4463f.webp
72898a5d-23fd-48f4-b88e-dc94cf0d232d.webp
I really like this magnetic mount. Where can I find it?
 

Twisted

TRD Off-Road
Well-known member
Joined
Jun 2, 2025
Threads
8
Messages
88
Reaction score
109
Location
Oregon
Vehicle(s)
5th Gen TRD -> 6th Gen TRDORP
I just use the Veritas Vans mount with magnets and Peakdoo battery. The "missing" crossbar for the rack is one of the rear ones so I use that open space. I PPF'd a couple runners on the roof where the magnets attach. When I need Starlink I just slap it up there and I'm good for 4+ hours on the battery without a charge. Because it sits below the rack platform level it is pretty safe from anything and doesn't stand out at all.

Added bonus of the battery, the Starlink doesn't shut off when you shut off the rig requiring it to reboot and reconnect all the time. If I ever get in a situation that i need constant use I will just hastily run a USB cable up to it.

Most the time I just rides in back with a charge for when I need it.
 
OP
OP
bobholthaus

bobholthaus

Well-known member
First Name
Bob
Joined
Apr 10, 2024
Threads
8
Messages
96
Reaction score
34
Location
St. Louis MO
Vehicle(s)
Jeep JL-370 AEV Diesel
@Twisted based upon your suggestion, I’m going to go with the following Veritas Vans set up and would love to get your guys opinions:

1 - Mount
1 - No drill adhesive plates
1 - Veritas Roof Entry Gland
1 - Surface Mount USB port
1 - 12ā€ DC to DC cord for Mini to Gland

My intention is to permanently stick the no drill adhesive plates to the roof of the vehicle. When I have the Veritas mount with the dish in it on the roof, it will at least be screwed down so that no one can easily steal it.

Then I’m going to put the roof entry gland somewhere right by it and hardwire that thing under the roof liner down to the battery side of the rear compartments.

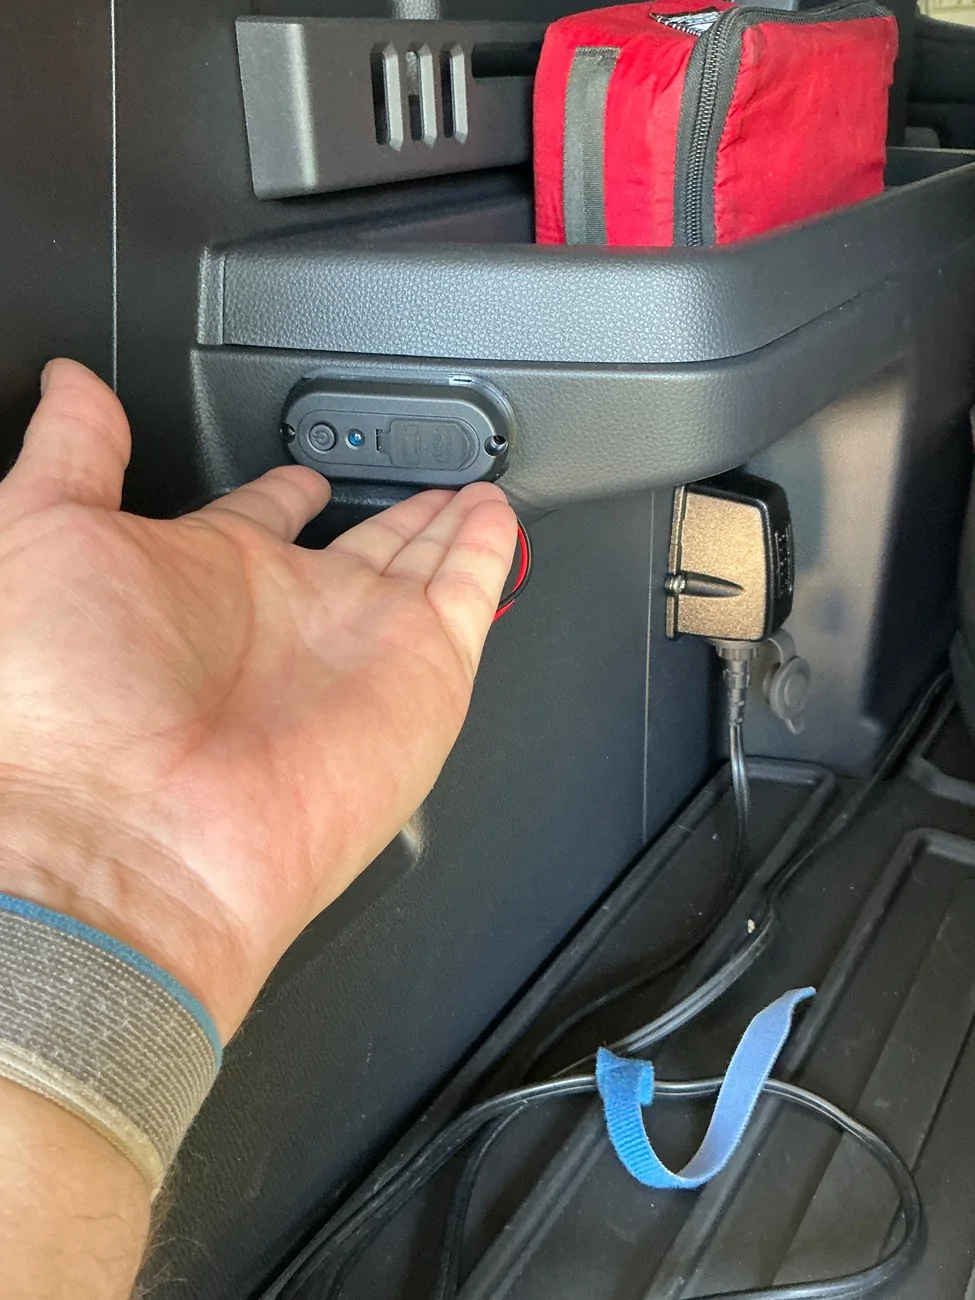
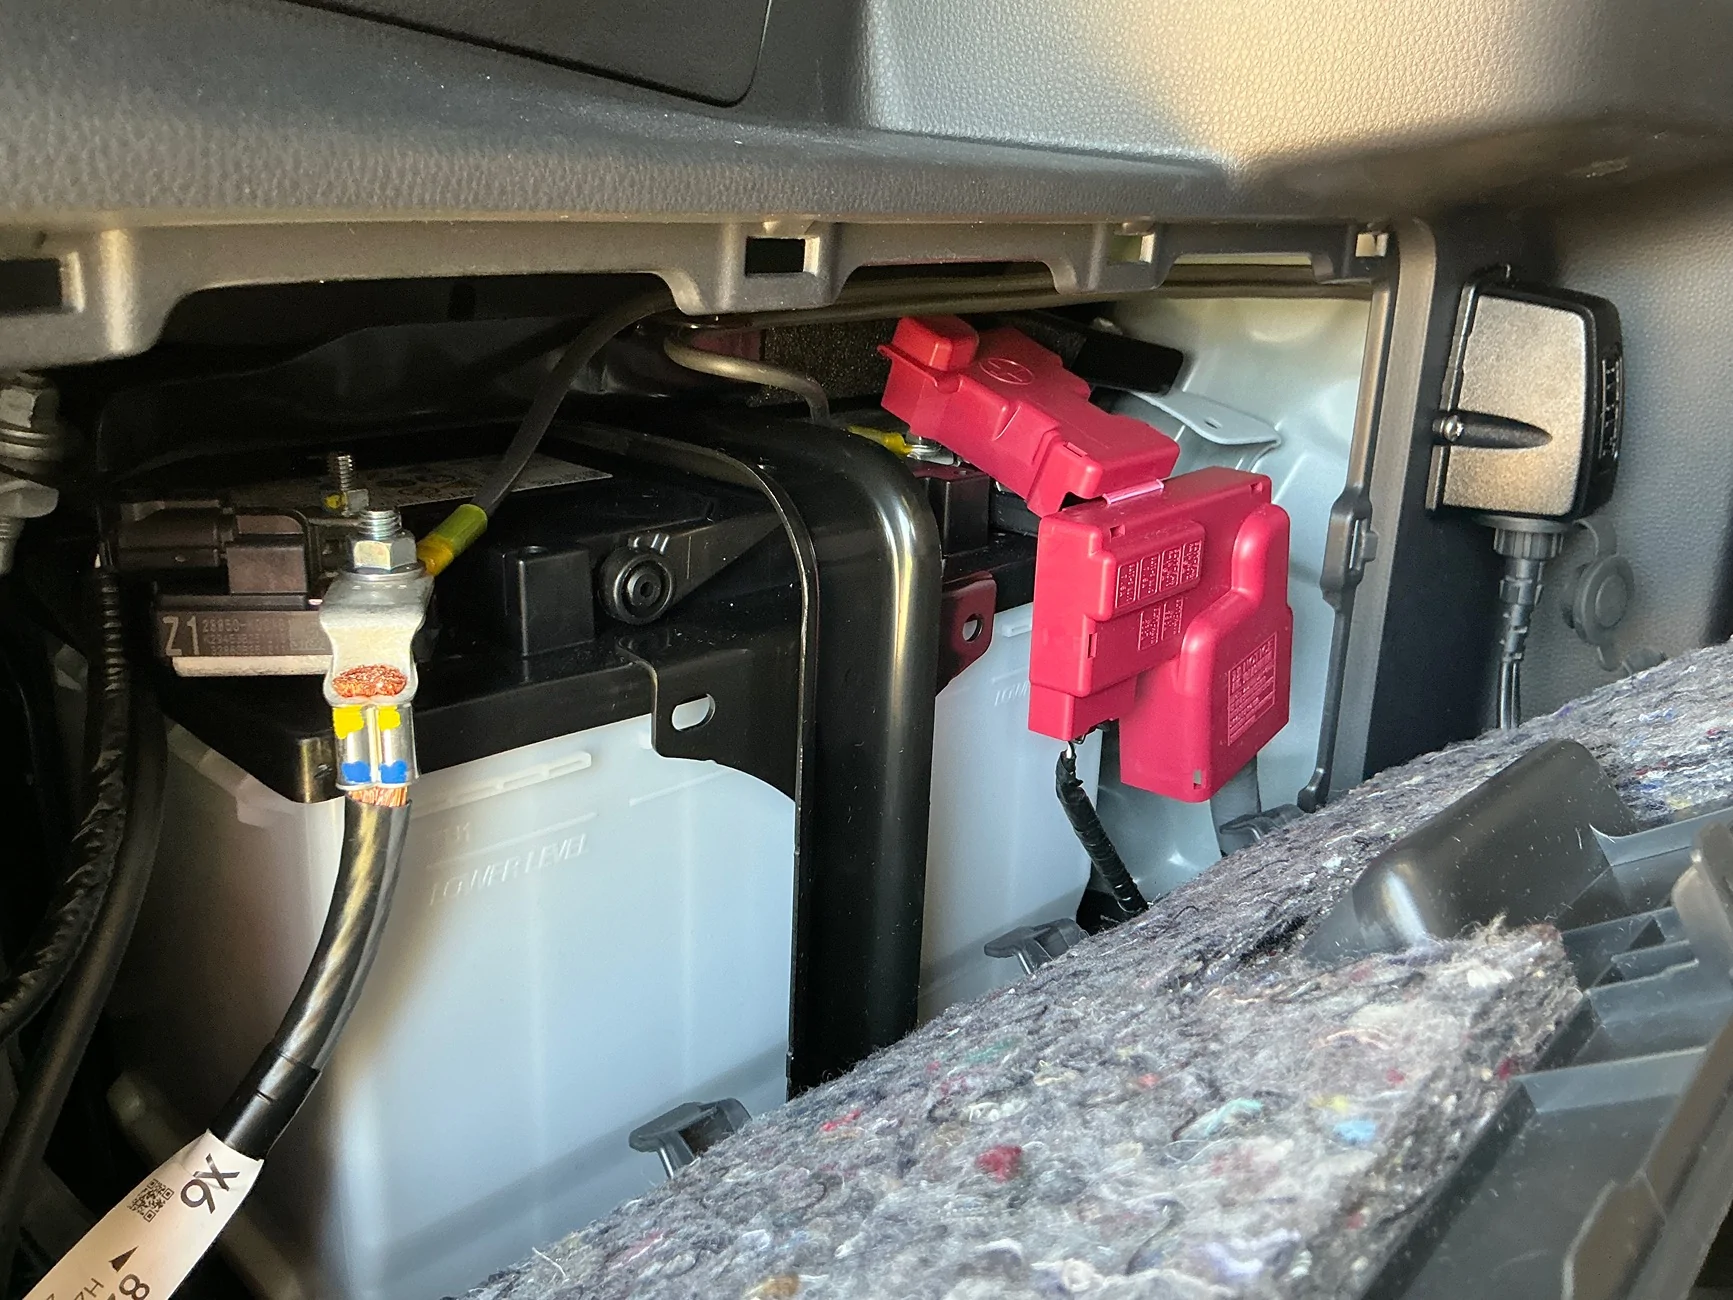
I’m going to mount a surface mount USB port as shown in the picture below, and I will have the Starlink cord come out of a little hole that is grommeted and plug into one of the USB-C ports on that thing. That way I can run it live all the time or I can just press that little power button on that unit and it will turn it off.

As you can see from my picture, I already wired in an ARB outlet for my ARB fridge freezer. I need to add an in-line fuse for both of these.

I may actually wire in two of these little surfacemount USB so I can have one that’s exclusively used for the Starlink and another one that I can use to charge headlamps and flashlights and the like.

The only thing I don’t have listed is the power cord that’s gonna run through the headliner down to the USB C power ports. Because I don’t know what length I need there yet. I’m guessing that’s going to be about 6 feet.

Thoughts on all of this?

2025 2026 4runner 6th gen Mounting Starlink Mini to OEM Trailhunter Rack IMG_1555


2025 2026 4runner 6th gen Mounting Starlink Mini to OEM Trailhunter Rack IMG_1556
 
Last edited:

Peppoh

TRD Off-Road Premium
Member
First Name
Gigi
Joined
Nov 2, 2025
Threads
5
Messages
11
Reaction score
6
Location
CA
Vehicle(s)
4Runner 6th
Hi @bobholthaus a few thoughts:

Why using a full enclosure if the Mini is already waterproof (IP67)? In my opinion, the limited benefit you get for the additional protection (hail is the selling proposition) is easily offset by worst cooling since the jacket is a sort of heat insulation. I would rather use an open-design enclosure but, of course it depends on your use case. I like visiting southwestern desert outdoors, so heat build-up is a concern.

The no-drill plates are overpriced, $50 for two metal plates and some 3M VHB tape is insane. Anyway the issue I see from the pictures (I don’t own the VV mount so I’m just guessing) is that the whole assembly concept is bolting from bottom to the top. Means that when you have the enclosure and the plates assembled and stuck to the roof, you don’t have anymore access to those bolts. Nice for theft prevention but very unpractical when you need to remove the Mini.

The roof entry gland is what I really don’t understand: do you want to permanently damage your roof by drilling a hole in it? There are better ways to get power to the roof. My car came equipped with the pre-wired auxiliary switches: if you are so lucky, just get power from a pre-wired connector and run a cable from there. If you don’t, you can can use a grommet on the passenger side firewall that you can use to pass a cable from the interior of the vehicle to the engine bay and then up to the roof. Last option, what I did to get additional cabling to my roof rack, behind the rear lights there are grommets you can use to get cables from the rear side panels, exactly where the battery is sitting, to the exterior and then up to the roof. All these options are, in my opinion, way less invasive and easy to restore than damaging your roof.

USB port: 12 volt is usually fine but, depending on the cable length and quality, the voltage drop can prevent the Mini from properly booting up. Also 30W is not adequate: during boot-up or heavy-duty usage, the Mini can consume up to 60W. The Starlink official power supply is 30V 2A, if I remember well. My suggestion is to use a voltage step-up converter to get 24V output and at least 60W power output. Mini accepts from 12V to 48V so 30V or 36V works as well. There are several options on Amazon or other major retailers.

Hope this all makes sense for you and help you refine your project. If you need pictures of the different ways to run a cable to the roof, let me know and I’ll take some and post. Just reiterating: please, please, please, don’t drill a hole in your beautiful 4Runner roof😁
 
OP
OP
bobholthaus

bobholthaus

Well-known member
First Name
Bob
Joined
Apr 10, 2024
Threads
8
Messages
96
Reaction score
34
Location
St. Louis MO
Vehicle(s)
Jeep JL-370 AEV Diesel
Hi @bobholthaus a few thoughts:

Why using a full enclosure if the Mini is already waterproof (IP67)? In my opinion, the limited benefit you get for the additional protection (hail is the selling proposition) is easily offset by worst cooling since the jacket is a sort of heat insulation. I would rather use an open-design enclosure but, of course it depends on your use case. I like visiting southwestern desert outdoors, so heat build-up is a concern.

The no-drill plates are overpriced, $50 for two metal plates and some 3M VHB tape is insane. Anyway the issue I see from the pictures (I don’t own the VV mount so I’m just guessing) is that the whole assembly concept is bolting from bottom to the top. Means that when you have the enclosure and the plates assembled and stuck to the roof, you don’t have anymore access to those bolts. Nice for theft prevention but very unpractical when you need to remove the Mini.

The roof entry gland is what I really don’t understand: do you want to permanently damage your roof by drilling a hole in it? There are better ways to get power to the roof. My car came equipped with the pre-wired auxiliary switches: if you are so lucky, just get power from a pre-wired connector and run a cable from there. If you don’t, you can can use a grommet on the passenger side firewall that you can use to pass a cable from the interior of the vehicle to the engine bay and then up to the roof. Last option, what I did to get additional cabling to my roof rack, behind the rear lights there are grommets you can use to get cables from the rear side panels, exactly where the battery is sitting, to the exterior and then up to the roof. All these options are, in my opinion, way less invasive and easy to restore than damaging your roof.

USB port: 12 volt is usually fine but, depending on the cable length and quality, the voltage drop can prevent the Mini from properly booting up. Also 30W is not adequate: during boot-up or heavy-duty usage, the Mini can consume up to 60W. The Starlink official power supply is 30V 2A, if I remember well. My suggestion is to use a voltage step-up converter to get 24V output and at least 60W power output. Mini accepts from 12V to 48V so 30V or 36V works as well. There are several options on Amazon or other major retailers.

Hope this all makes sense for you and help you refine your project. If you need pictures of the different ways to run a cable to the roof, let me know and I’ll take some and post. Just reiterating: please, please, please, don’t drill a hole in your beautiful 4Runner roof😁
Thanks for the reminder that 30w wasn't enough juice; I'll have to find an outlet with more than 30w. That's a bummer because those were going to fit that spot perfectly.

On drilling the roof: I want a clean, OEM look. No visible wires. I've been doing 12v for 30 years and I'm not worried at all about piercing the roof. The VHB on that mount will seal it perfectly. I have an RV that I've run multiple roof penetrations on with no issues. From the ground, no one will ever know I did it.

on the mounts: they are threaded and the starling screws down into them with four Allen head screws. If I switch over to safety screws, there's less of a chance it will be stolen. I feel much better about having the things screwed down as well. Those should be a no-brainer since the metal will be sticking to absolutely flat parts of the roof. And since the roof has some raised sections to it, I measured and I can either mount those on the raised section or on the recessed section, if the mount sticks down deeply enough.

I appreciate you taking all the time to give me your feedback. This is why I love these forms. I'm going to try to find a better power supply for that thing now. I just really like that little one because I had the off button and I could quickly just press it when I wanted to turn it off.
 

Peppoh

TRD Off-Road Premium
Member
First Name
Gigi
Joined
Nov 2, 2025
Threads
5
Messages
11
Reaction score
6
Location
CA
Vehicle(s)
4Runner 6th
I see your point about the roof. I have a roof rack, so wiring a cable along it was way easier for me. One additional thought: since you mention the USB port is solely dedicated to the Mini, why using a USB at all? You are anyway wiring to the battery and the only thing you need is an inline fuse and a panel mount switch. The advantage is that you get battery voltage that usually is between 13V and 14V and plenty of power so you don’t need to worry about voltage drop or finding a USB PD specced at 60W.
 
OP
OP
bobholthaus

bobholthaus

Well-known member
First Name
Bob
Joined
Apr 10, 2024
Threads
8
Messages
96
Reaction score
34
Location
St. Louis MO
Vehicle(s)
Jeep JL-370 AEV Diesel
I see your point about the roof. I have a roof rack, so wiring a cable along it was way easier for me. One additional thought: since you mention the USB port is solely dedicated to the Mini, why using a USB at all? You are anyway wiring to the battery and the only thing you need is an inline fuse and a panel mount switch. The advantage is that you get battery voltage that usually is between 13V and 14V and plenty of power so you don’t need to worry about voltage drop or finding a USB PD specced at 60W.
After your advice, I found exactly that, a voltage lifter thing that buys directly to the battery. And has the same port on it that the Starlink does. So I'm just gonna put a little in-line switch right there outside the battery bay with an in-line fuse and wire it directly to the battery. Thank you for that advice. It is spot on. I haven't found a cool illuminated Starlink switch that is two colors that I will use.
Sponsored


Top