

- Thread starter
- #1
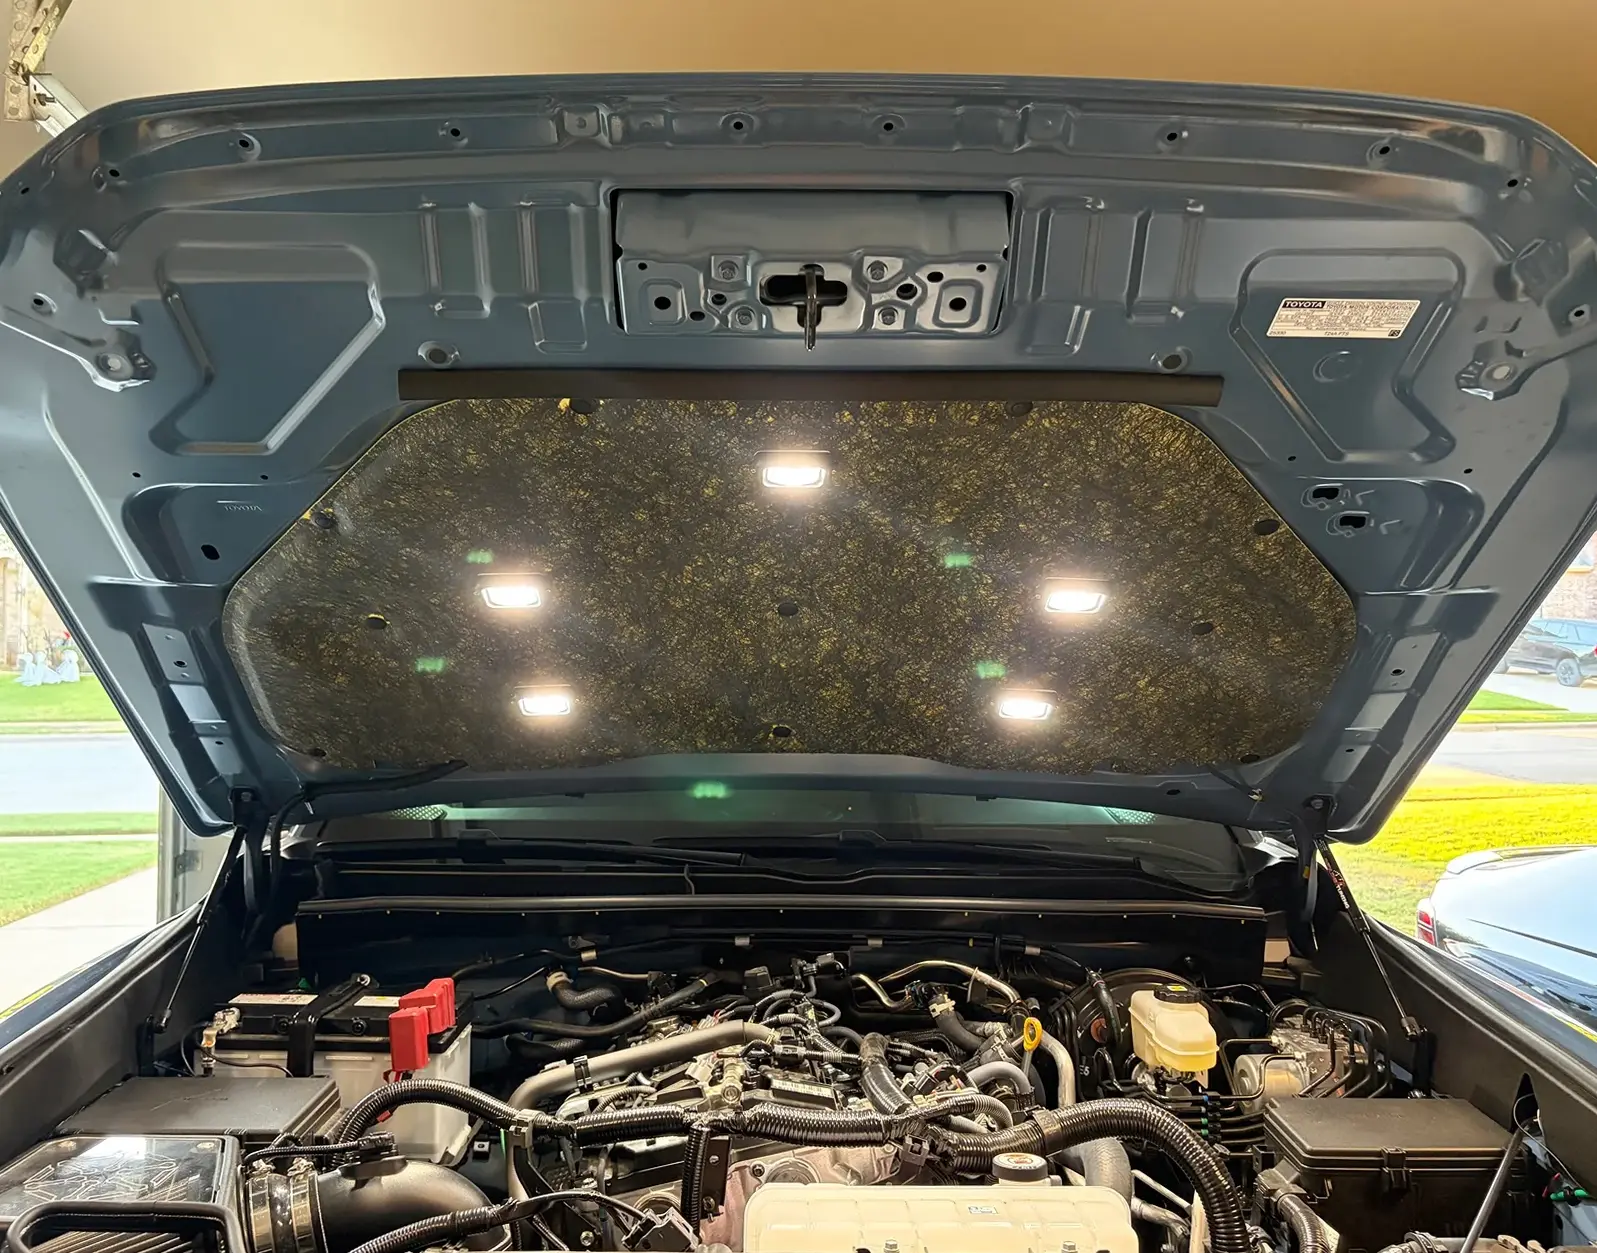
No more yelling at my son to hold the light! Big shout out to Billy Uldrich for giving me the idea and all the help.


DIY instructions:
Ok here you go! However, I did modify these instruction to make it a cleaner install and I only used 5 lights. Also, I have attached the supplies I ordered from Amazon. For the switch you need to trim the sides to fit in the hole. Use 5 MICTUNING C2 rock light pods instead of 8 simplifies the wiring slightly and reduces the current load. With 6 pods (assuming ~2-3A each at 12V), the total draw will be around 12-18A, which is well within the 18AWG wire's ~10A continuous rating per wire (safer with short runs) and the Nilight relay's built-in 30A fuse capacity. The single ground wire approach still works perfectly. Below is the revised box-based wiring diagram and steps tailored for 6 lights.Revised Printable Box-Based Wiring Diagram
+--------------------+ +--------------------+
| Battery (+) | | Battery (-) |
| | | [Ring Terminal] |
| [Red Wire] | | [Main Ground Wire]|
+--------------------+ +--------------------+
| |
| v
+--------------------+ +--------------------+
| Relay (Pin 30) |<------| Relay (Pin 86) |
| [Built-in 30A Fuse]| | [Spliced to Ground]|
| | | |
| [Red Wire] | +--------------------+
+--------------------+ |
| v
+--------------------+ +--------------------+
| Relay (Pin 87) |<------| Lights (Black -) |
| [Red Wire to Lights]| | [Spliced to Ground]|
| | +--------------------+
+--------------------+
|
| [Red Wire]
v
+--------------------+
| Lights (Red +) |
| [Main Red Wire] |
| [Parallel 6 Pods] |
+--------------------+
|
| [Red Wire]
v
+--------------------+
| Switch (Pin 1) |
| [Control to Relay] |
| |
+--------------------+
| [Red Wire via T-Tap]
v
+--------------------+
| Switch (Pin 2) |
| [Power from Relay] |
| |
+--------------------+
| [T-Tap to Red Wire from Battery]
+------------------> To Relay (Pin 85)
Revised Wiring Steps
1. Connect the 5 Lights (Parallel Wiring):
• Lay out 5 light pods. Each has a red (+) and black (-) wire.
• Join all 5 red wires into ONE main red wire:
• Use Kuject heat shrink connectors (butt splices).
• Strip 1/2” off each wire. Splice 3 reds (pods 1-3) to a 2ft red pigtail, then splice the other 3 (pods 4-6) to another 2ft red pigtail.
• Splice both pigtails to a 4ft main red wire. Heat-shrink all splices.
• Join all 5 black wires into ONE 4ft main black wire (same splicing method).
• Set these main red and black wires aside for later connection.
2. Create a Common Ground Wire:
• Cut a 5-6ft black 18AWG wire (from your 50ft black supply).
• Crimp a Conext Link ring terminal on one end and attach to the battery negative (-) post.
• This is your "main ground wire."
3. Mount Components:
• Attach 5 lights to the hood insulation (using your method, e.g., clips).
• Mount the Nilight relay near the battery (zip-tie to a bracket).
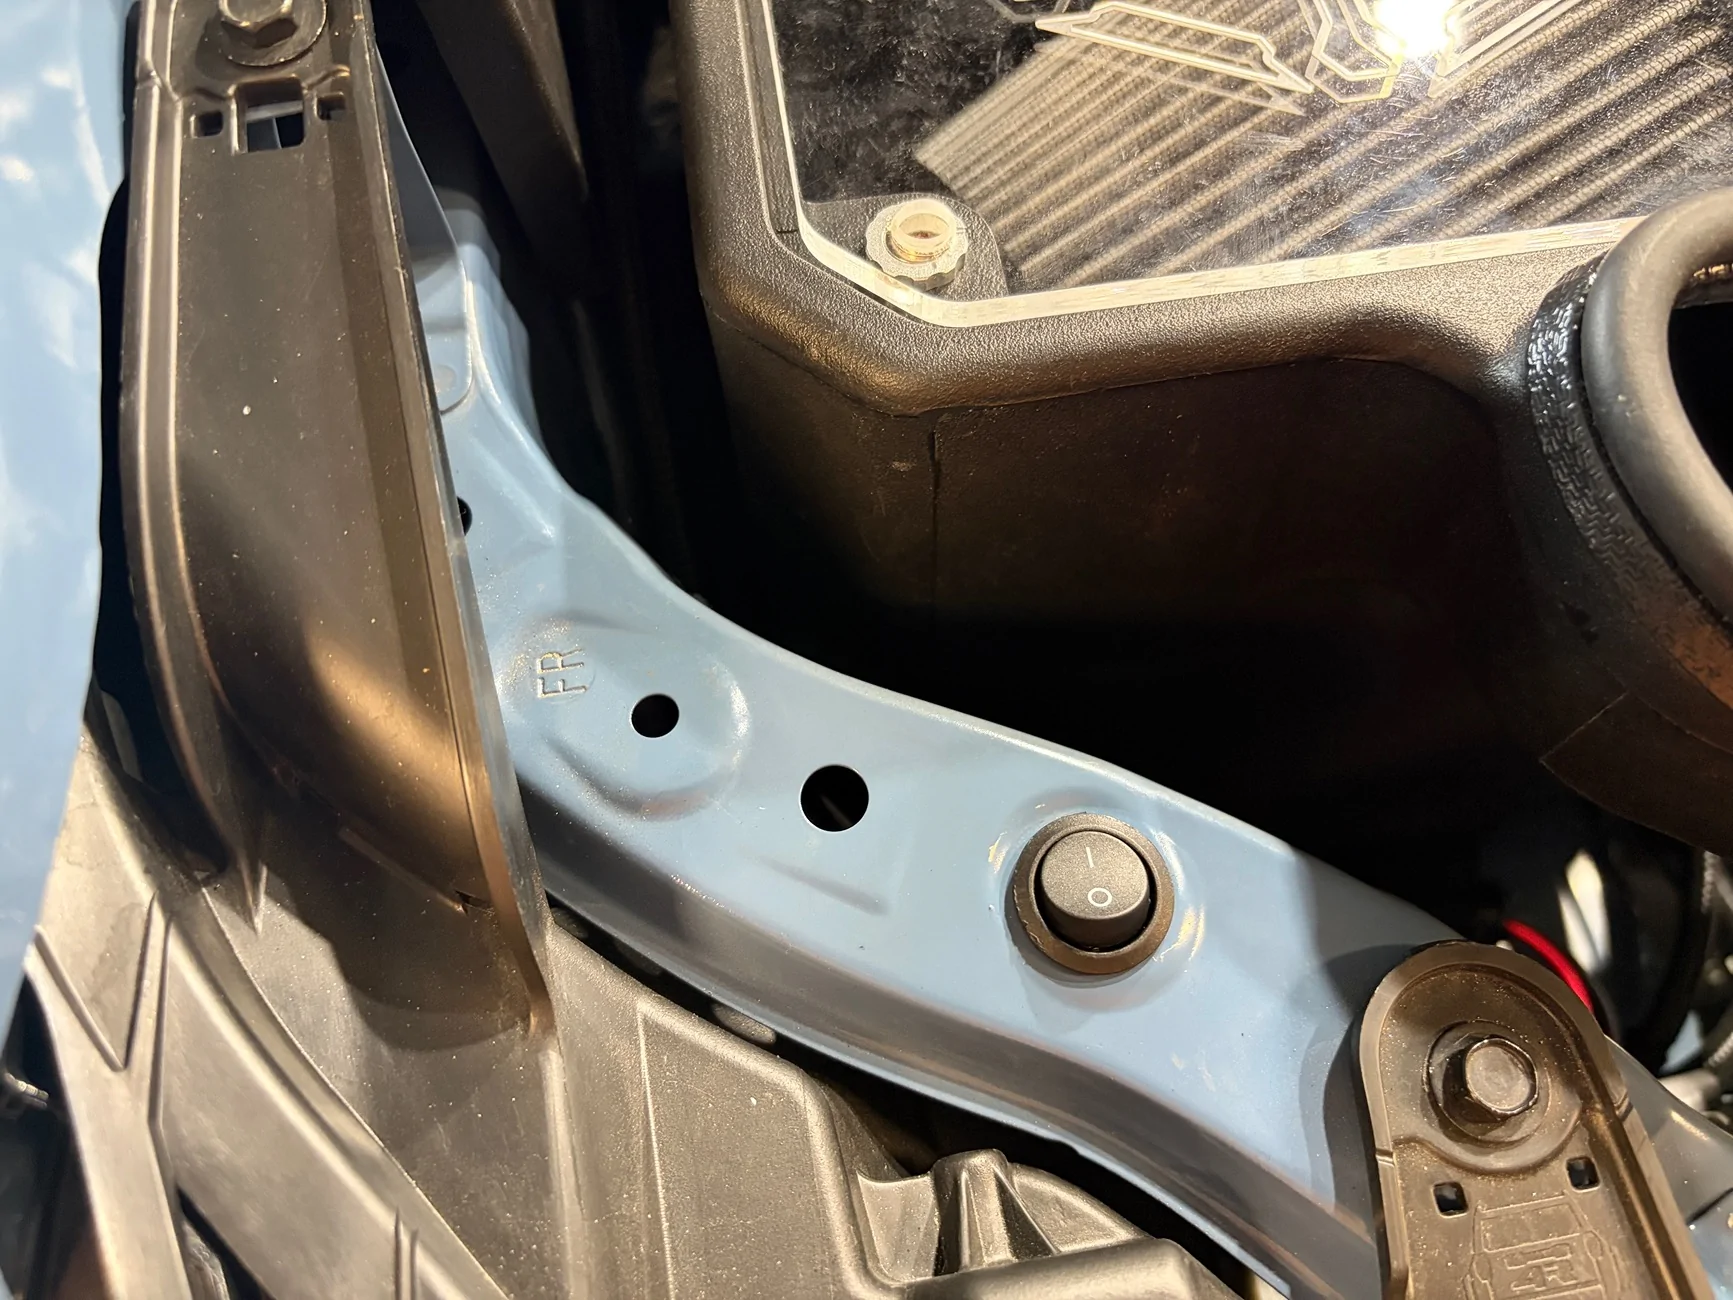
• Mount the DaierTek rocker switch in the engine bay (Trim the switch and put it in the hole near the air intake).
• Route the main red/black wires from lights to the battery area, securing with zip ties.
4. Connect Grounds:
• Splice the main black wire from the lights into the "main ground wire" using a Kuject heat shrink connector.
• Splice the black wire from Relay Pin 86 (cut ~2ft) into the "main ground wire" with another Kuject connector.
5. Connect Battery to Relay:
• Cut a 2ft red 18AWG wire. Crimp a ring terminal on one end, attach to battery positive (+).
• Connect the other end to Relay Pin 30 (use a MUYI connector or heat shrink splice).
6. Connect Lights to Relay:
• Connect the main red wire from the 6 lights to Relay Pin 87 (use Kuject heat shrink splice).
7. Wire the Switch:
• Cut a 3ft red 18AWG wire. Connect to Relay Pin 85 and Switch Pin 1 (use MUYI connector).
• Use a Mavelovs T-tap on the red wire from Battery to Relay Pin 30. Cut a 3ft red wire, plug into T-tap, and connect to Switch Pin 2 (MUYI connector).
8. Test and Secure:
• Check all connections are tight and heat-shrunk.
• Reconnect battery negative (-).
• Flip switch ON: 5 lights should turn on (relay clicks). OFF turns them off.
• Secure all wires with zip ties, avoiding heat/exhaust. Supplies: 130PCS Automotive Cable Ties and Wire Loom Kit,Includes 6 Sizes Wire Clips for Storaging and Protecting Cable,Universal Cable Retainer Clips Car Accessories for Car SUV Truck
XFasten Wire Harness Tape 3/4 Inch x 50 ft, Residue-Free Cloth Electrical Felt Tape for Automotive Wiring Loom Wrap, High Temp and Abrasion Resistant, Noise Dampening Insulation
VISDOLL T Tap Wire Splice Connectors for 16-20 AWG, 3 Way 1 Pin Low Voltage Wire Connectors 10Pcs Solderless No Wire Stripping Quick Wire Splitter Connectors
2 Wire Connector, MUYI 5 Kit Electric Connector 18 AWG Connectors Waterproof Electrical Connector 1.0mm² Wire Harness 1.5mm Series Terminal
18 Gauge Electrical Wire 2 Pack Total 100ft-Black 50 ft and Red 50 ft Soft Flexible Copper-Clad Aluminum(CCA) 18 AWG PVC Wire for Lamp, Household Appliances RC Toys, Models, Auto, Electronics
DaierTek ON Off Round Rocker Switches SPST 20mm Mini 12 Volt DC Mini Circle Toggle Switch 12V for Car Automotive RV 2 Pin Switch 120V Wired KCD1-5Pack
Nilight 50023R 5 Pack 30A Fused Relay Switch Kit 12V 4 Pin SPST Relay Interlocking Harness Socket Holder 30 Amp 12 Volt Automotive Relays with Fuse for Auto Cars Trucks RV
Conext Link RTV-516R25 Vinyl Ring Terminal 25 Pack (5/16" Stud, Red 22-18 Gauge)
MICTUNING C2 Curved White Rock Lights - 8 Pods Underglow Lights Compatible for Car Truck Offroad Boat, IP68 Waterproof
DIY instructions:
Ok here you go! However, I did modify these instruction to make it a cleaner install and I only used 5 lights. Also, I have attached the supplies I ordered from Amazon. For the switch you need to trim the sides to fit in the hole. Use 5 MICTUNING C2 rock light pods instead of 8 simplifies the wiring slightly and reduces the current load. With 6 pods (assuming ~2-3A each at 12V), the total draw will be around 12-18A, which is well within the 18AWG wire's ~10A continuous rating per wire (safer with short runs) and the Nilight relay's built-in 30A fuse capacity. The single ground wire approach still works perfectly. Below is the revised box-based wiring diagram and steps tailored for 6 lights.Revised Printable Box-Based Wiring Diagram
+--------------------+ +--------------------+
| Battery (+) | | Battery (-) |
| | | [Ring Terminal] |
| [Red Wire] | | [Main Ground Wire]|
+--------------------+ +--------------------+
| |
| v
+--------------------+ +--------------------+
| Relay (Pin 30) |<------| Relay (Pin 86) |
| [Built-in 30A Fuse]| | [Spliced to Ground]|
| | | |
| [Red Wire] | +--------------------+
+--------------------+ |
| v
+--------------------+ +--------------------+
| Relay (Pin 87) |<------| Lights (Black -) |
| [Red Wire to Lights]| | [Spliced to Ground]|
| | +--------------------+
+--------------------+
|
| [Red Wire]
v
+--------------------+
| Lights (Red +) |
| [Main Red Wire] |
| [Parallel 6 Pods] |
+--------------------+
|
| [Red Wire]
v
+--------------------+
| Switch (Pin 1) |
| [Control to Relay] |
| |
+--------------------+
| [Red Wire via T-Tap]
v
+--------------------+
| Switch (Pin 2) |
| [Power from Relay] |
| |
+--------------------+
| [T-Tap to Red Wire from Battery]
+------------------> To Relay (Pin 85)
Revised Wiring Steps
1. Connect the 5 Lights (Parallel Wiring):
• Lay out 5 light pods. Each has a red (+) and black (-) wire.
• Join all 5 red wires into ONE main red wire:
• Use Kuject heat shrink connectors (butt splices).
• Strip 1/2” off each wire. Splice 3 reds (pods 1-3) to a 2ft red pigtail, then splice the other 3 (pods 4-6) to another 2ft red pigtail.
• Splice both pigtails to a 4ft main red wire. Heat-shrink all splices.
• Join all 5 black wires into ONE 4ft main black wire (same splicing method).
• Set these main red and black wires aside for later connection.
2. Create a Common Ground Wire:
• Cut a 5-6ft black 18AWG wire (from your 50ft black supply).
• Crimp a Conext Link ring terminal on one end and attach to the battery negative (-) post.
• This is your "main ground wire."
3. Mount Components:
• Attach 5 lights to the hood insulation (using your method, e.g., clips).
• Mount the Nilight relay near the battery (zip-tie to a bracket).
• Mount the DaierTek rocker switch in the engine bay (Trim the switch and put it in the hole near the air intake).
• Route the main red/black wires from lights to the battery area, securing with zip ties.
4. Connect Grounds:
• Splice the main black wire from the lights into the "main ground wire" using a Kuject heat shrink connector.
• Splice the black wire from Relay Pin 86 (cut ~2ft) into the "main ground wire" with another Kuject connector.
5. Connect Battery to Relay:
• Cut a 2ft red 18AWG wire. Crimp a ring terminal on one end, attach to battery positive (+).
• Connect the other end to Relay Pin 30 (use a MUYI connector or heat shrink splice).
6. Connect Lights to Relay:
• Connect the main red wire from the 6 lights to Relay Pin 87 (use Kuject heat shrink splice).
7. Wire the Switch:
• Cut a 3ft red 18AWG wire. Connect to Relay Pin 85 and Switch Pin 1 (use MUYI connector).
• Use a Mavelovs T-tap on the red wire from Battery to Relay Pin 30. Cut a 3ft red wire, plug into T-tap, and connect to Switch Pin 2 (MUYI connector).
8. Test and Secure:
• Check all connections are tight and heat-shrunk.
• Reconnect battery negative (-).
• Flip switch ON: 5 lights should turn on (relay clicks). OFF turns them off.
• Secure all wires with zip ties, avoiding heat/exhaust. Supplies: 130PCS Automotive Cable Ties and Wire Loom Kit,Includes 6 Sizes Wire Clips for Storaging and Protecting Cable,Universal Cable Retainer Clips Car Accessories for Car SUV Truck
XFasten Wire Harness Tape 3/4 Inch x 50 ft, Residue-Free Cloth Electrical Felt Tape for Automotive Wiring Loom Wrap, High Temp and Abrasion Resistant, Noise Dampening Insulation
VISDOLL T Tap Wire Splice Connectors for 16-20 AWG, 3 Way 1 Pin Low Voltage Wire Connectors 10Pcs Solderless No Wire Stripping Quick Wire Splitter Connectors
2 Wire Connector, MUYI 5 Kit Electric Connector 18 AWG Connectors Waterproof Electrical Connector 1.0mm² Wire Harness 1.5mm Series Terminal
18 Gauge Electrical Wire 2 Pack Total 100ft-Black 50 ft and Red 50 ft Soft Flexible Copper-Clad Aluminum(CCA) 18 AWG PVC Wire for Lamp, Household Appliances RC Toys, Models, Auto, Electronics
DaierTek ON Off Round Rocker Switches SPST 20mm Mini 12 Volt DC Mini Circle Toggle Switch 12V for Car Automotive RV 2 Pin Switch 120V Wired KCD1-5Pack
Nilight 50023R 5 Pack 30A Fused Relay Switch Kit 12V 4 Pin SPST Relay Interlocking Harness Socket Holder 30 Amp 12 Volt Automotive Relays with Fuse for Auto Cars Trucks RV
Conext Link RTV-516R25 Vinyl Ring Terminal 25 Pack (5/16" Stud, Red 22-18 Gauge)
MICTUNING C2 Curved White Rock Lights - 8 Pods Underglow Lights Compatible for Car Truck Offroad Boat, IP68 Waterproof
Sponsored
